Caveat: Operating Systems, IDEs, tools, packages, dependencies, and languages are constantly changing. We do our best to keep this procedure current with the external changes. Tell us if you run into troubles.
These instructions are for a new Mac, or at least a Mac that hasn't been used for Python development before. Some of these tools may already be setup on your Mac, but reinstalling them causes no harm, skip the parts you are sure you already have.
If you have never installed Postgres on your Mac (or don't mind fully deleting any Postgres that you have already installed on your Mac), follow these instructions. They should take an hour or so to complete.
-
Install the Chrome browser for Mac
-
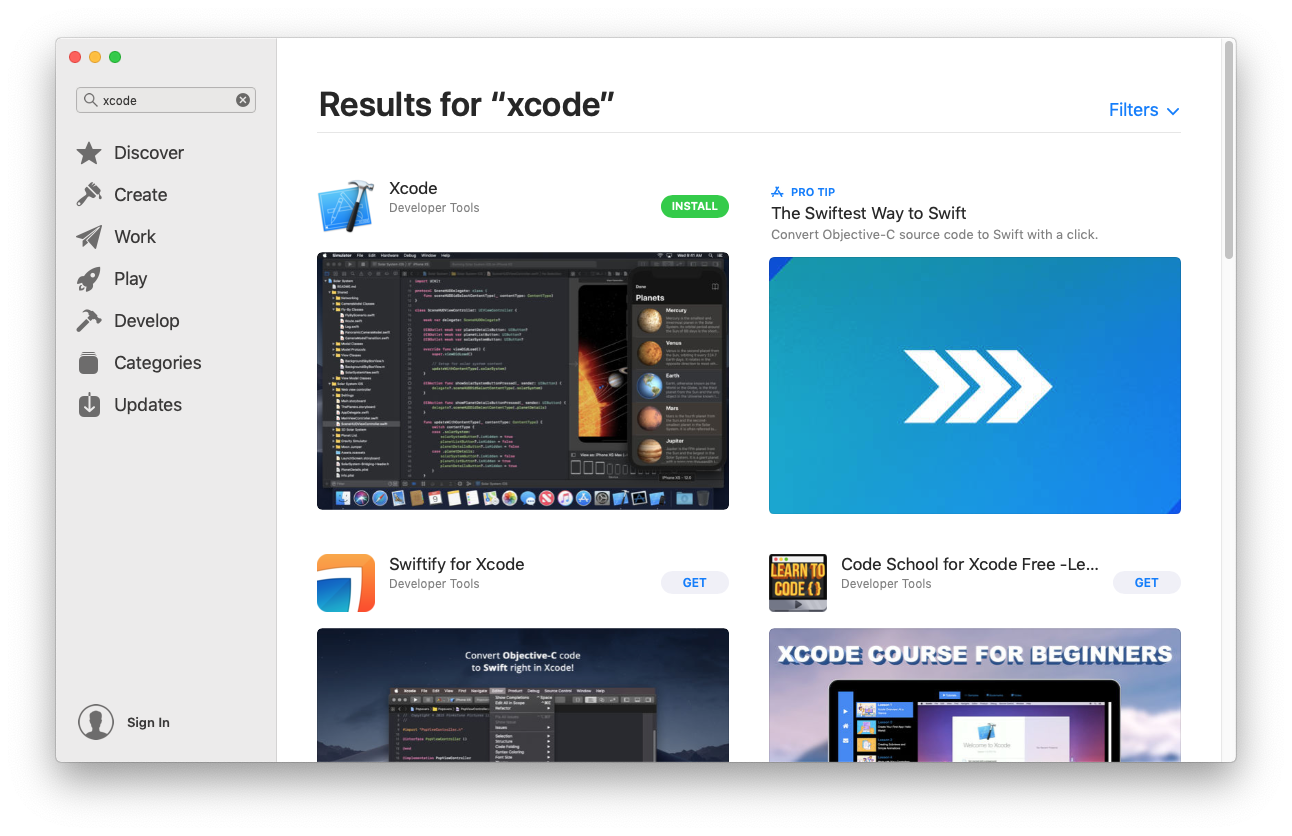
Open the Mac "App Store" app, and download the current version of Apple's Xcode, which includes "c" language compilers and native git integration. This download also includes Apple's Xcode IDE for macOS and iOS native development.
Note: Xcode requires about 13 GB of disk space, if you don't have much that room on your Mac, it is sufficient to download only the "Xcode Command Line Tools". Unfortunately you need to sign up as an Apple developer to do that. Download (the latest version of) "Command Line Tools for Xcode 13" at https://developer.apple.com/download/more/. These tools only require 185 MB of disk space. If you choose to download only the tools, skip on to Step 6.
If you have enough disk space, it is much easier to just install all of Xcode (including the full Xcode IDE) from the app store:
-
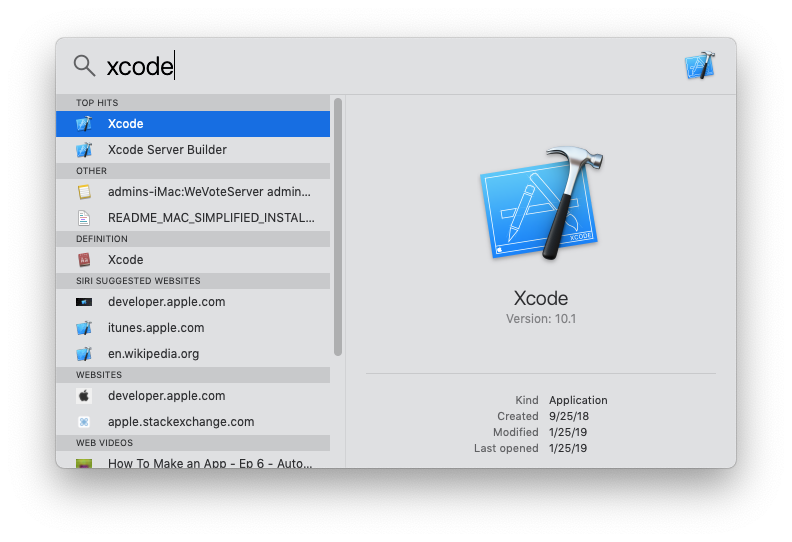
Start xcode (you can find it with Spotlight, or in the Application folder)
-
July 2022, this step happens without a prompt: When prompted, download the "Additional Components" (the Command Line Tools). This takes many minutes to complete.
-
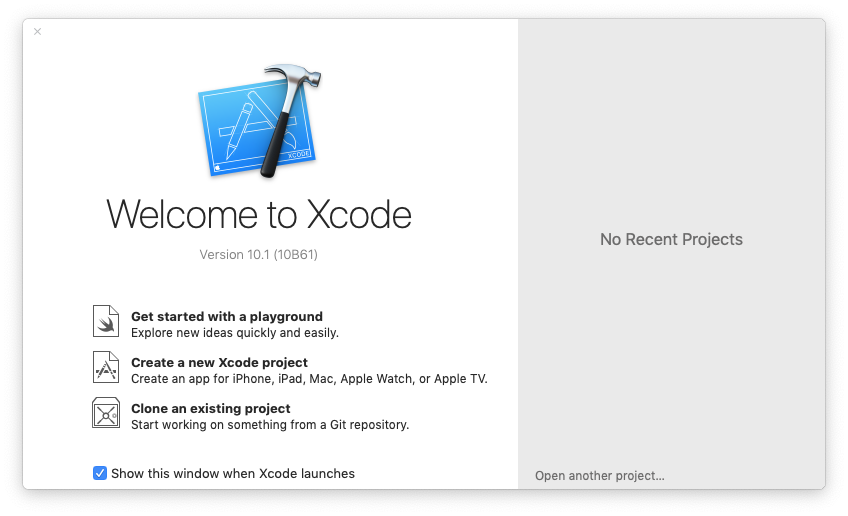
When you get to "Welcome to Xcode", quit out of the app. (For the WeVoteServer, we only need the command line tools that come with Xcode.)
-
Navigate in Chrome to GitHub. Create a personal account if you don't already have one.
-
Within the GitHub site, navigate to https://GitHub.com/wevote/WeVoteServer. Create a fork of wevote/WeVoteServer.git by selecting the "Fork" button (in the upper right of screen).

-
Download and install the Community version of PyCharm, it's free! (If you are a student, you can get PyCharem Professional for free. Professional is nice, but not necessary.) https://www.jetbrains.com/pycharm/download/#section=mac
-
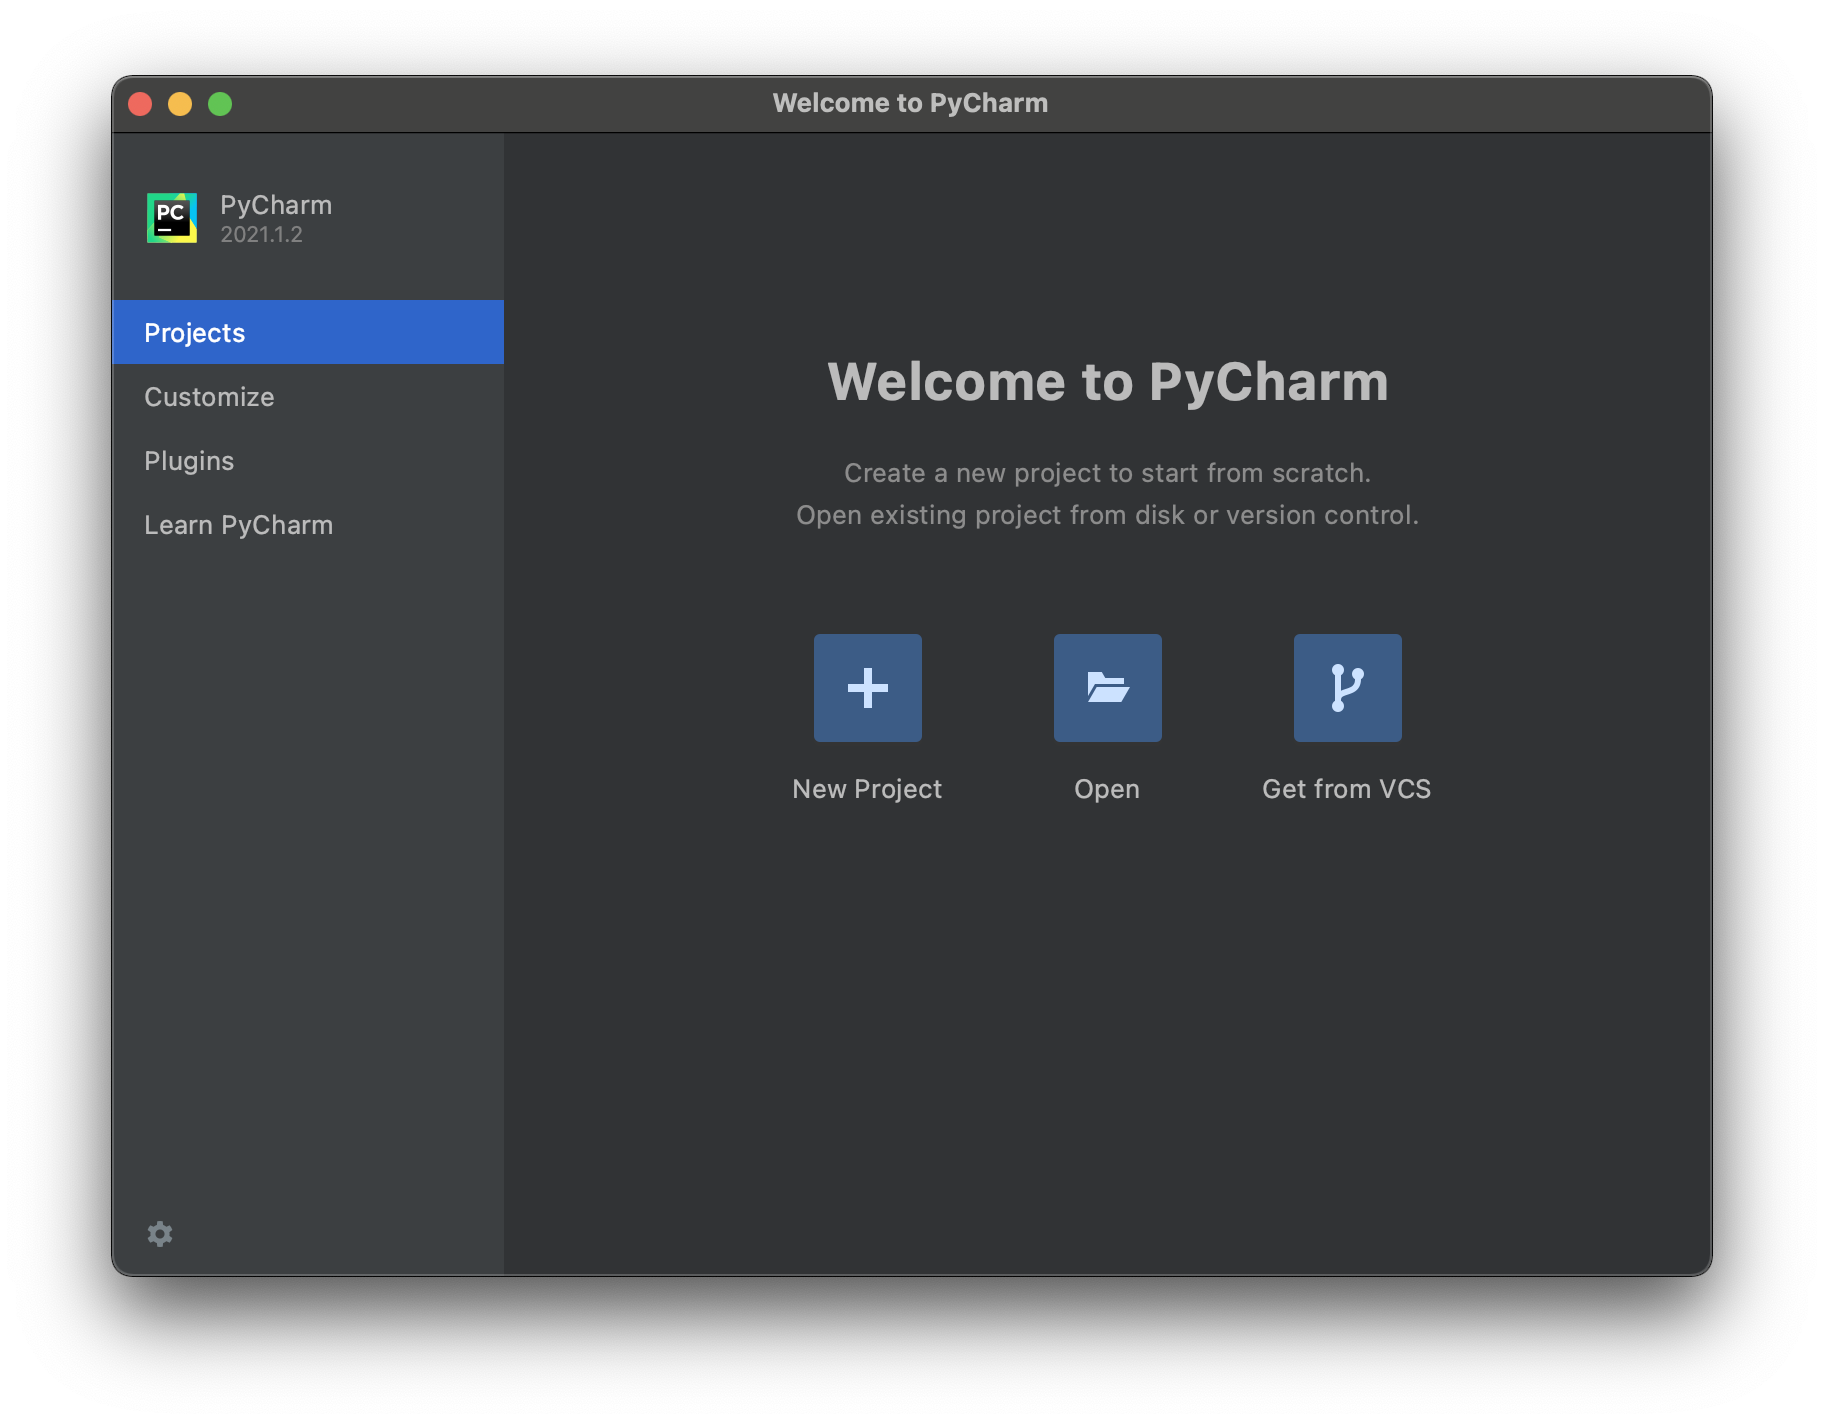
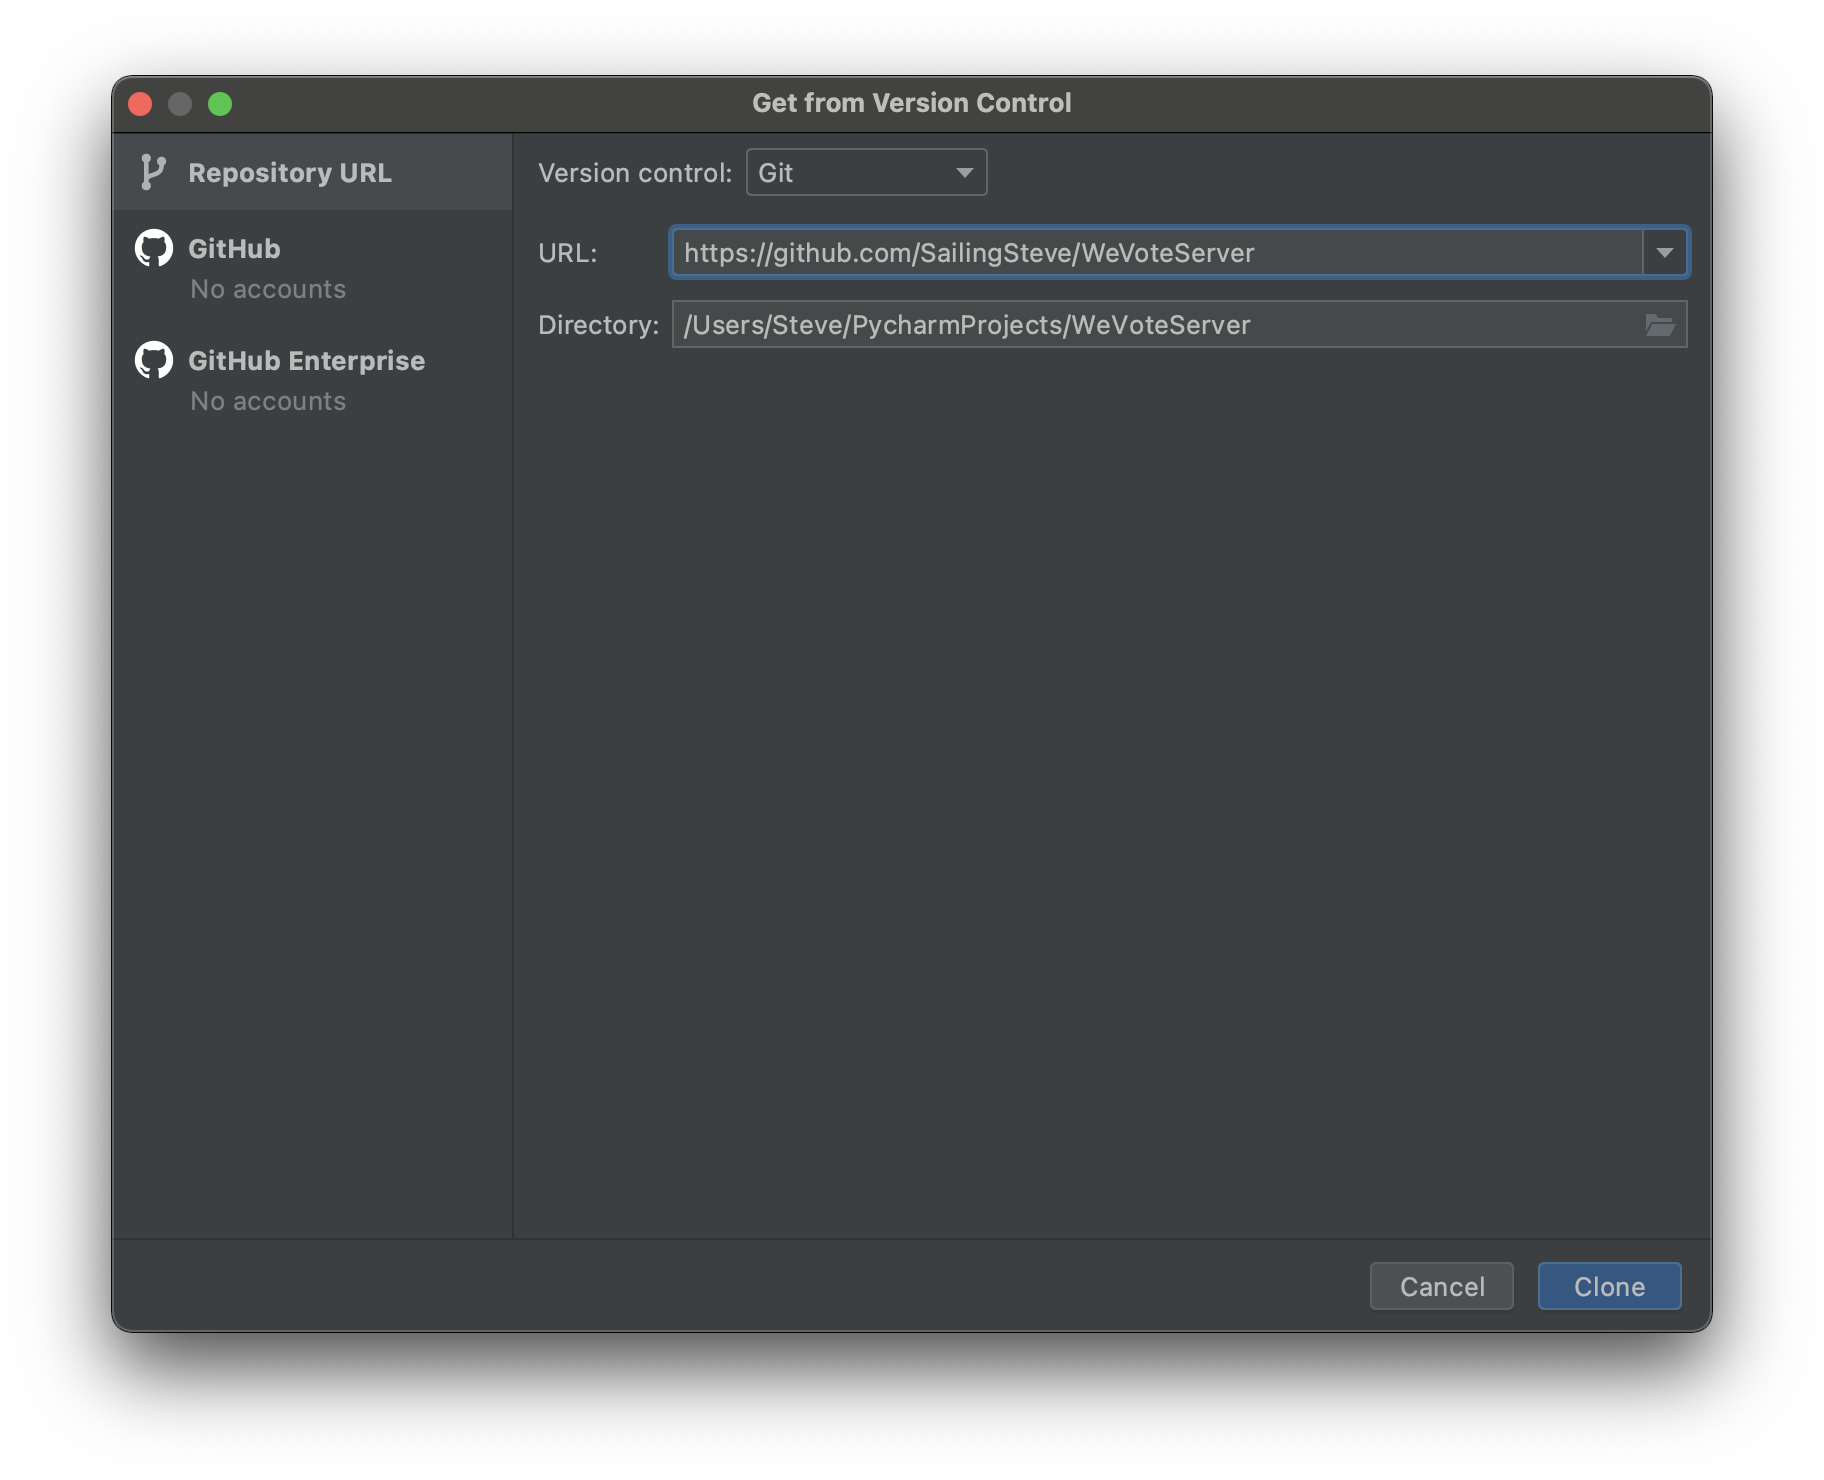
StartPyCharm, and press the 'Get from VCS' button.
-
Clone your fork of the git repository, by copying the URL to the repository into the URL filed, then press the Clone button. _What this means in english is that you have created a copy in GitHub of the WeVoteServer codebase, and cloning it downloads a copy of your copy to your Mac. At this instant, the 'develop' branch of wevote/WeVoteServer matches your branch (in this example) SailingSteve/WeVoteServer and also matches the code on your Mac.
-
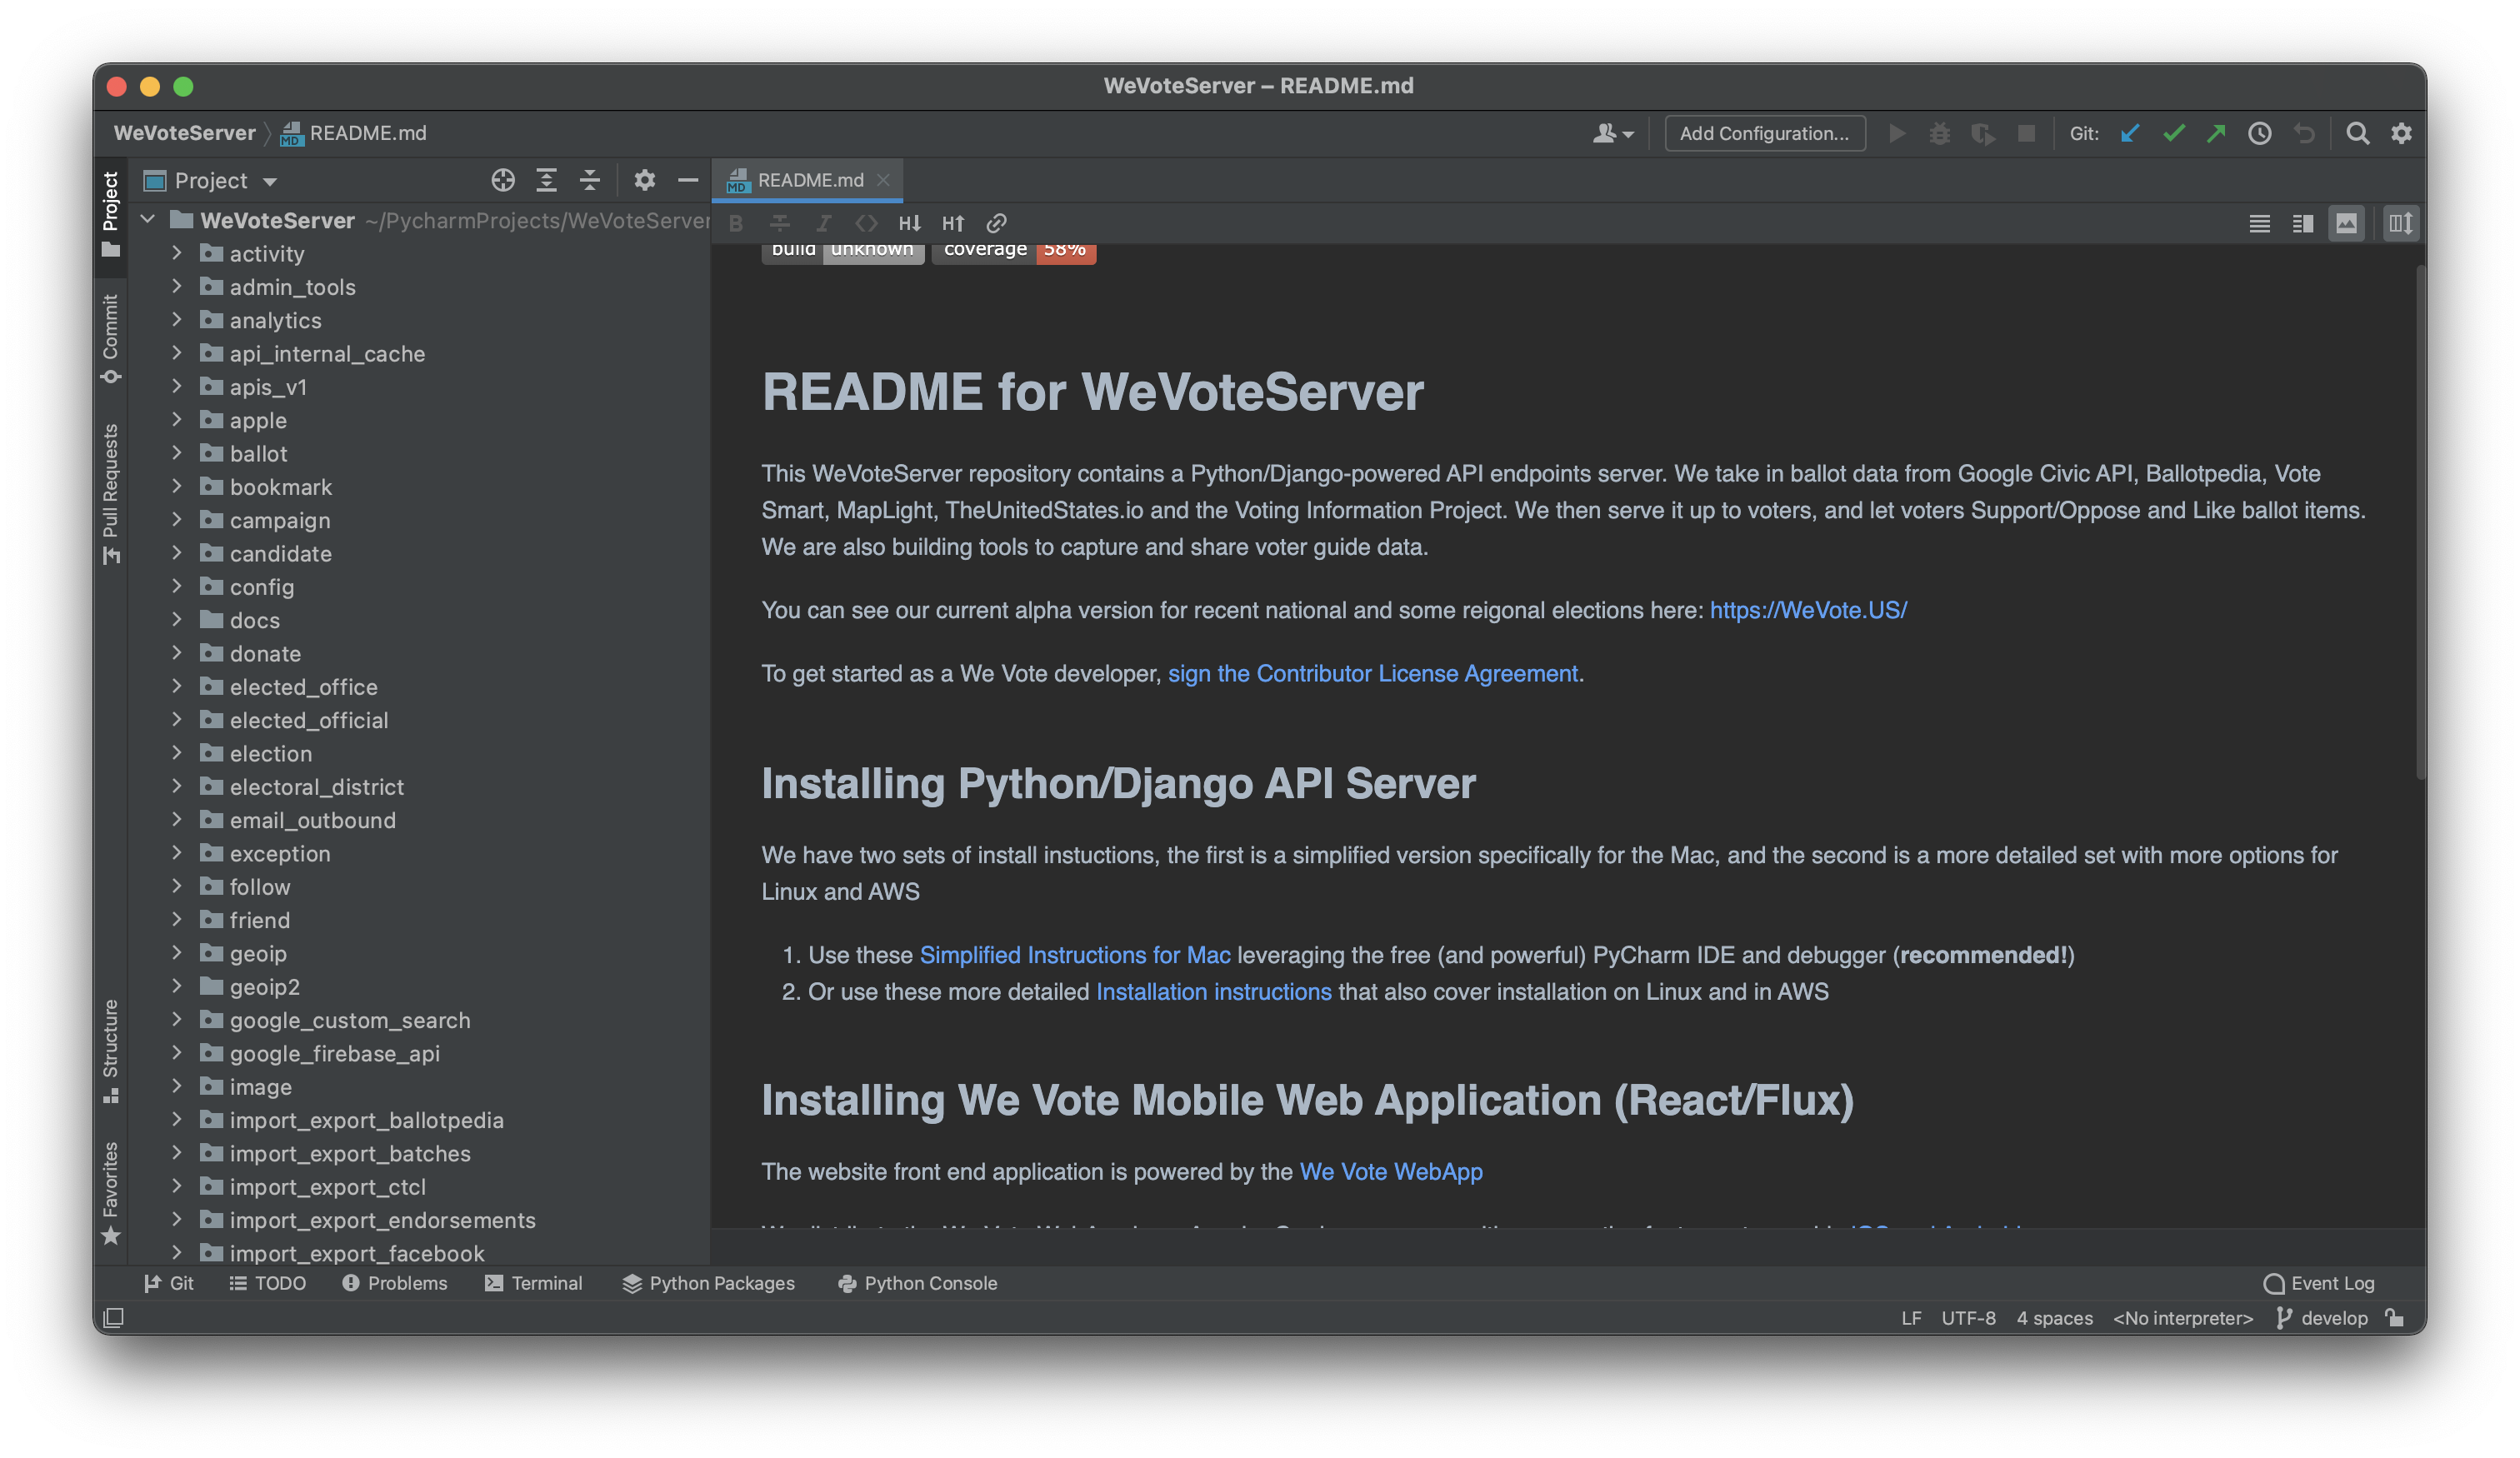
The PyCharm IDE appears in 'Dracula' mode, with the repository loaded to your disk, and ready to edit.
-
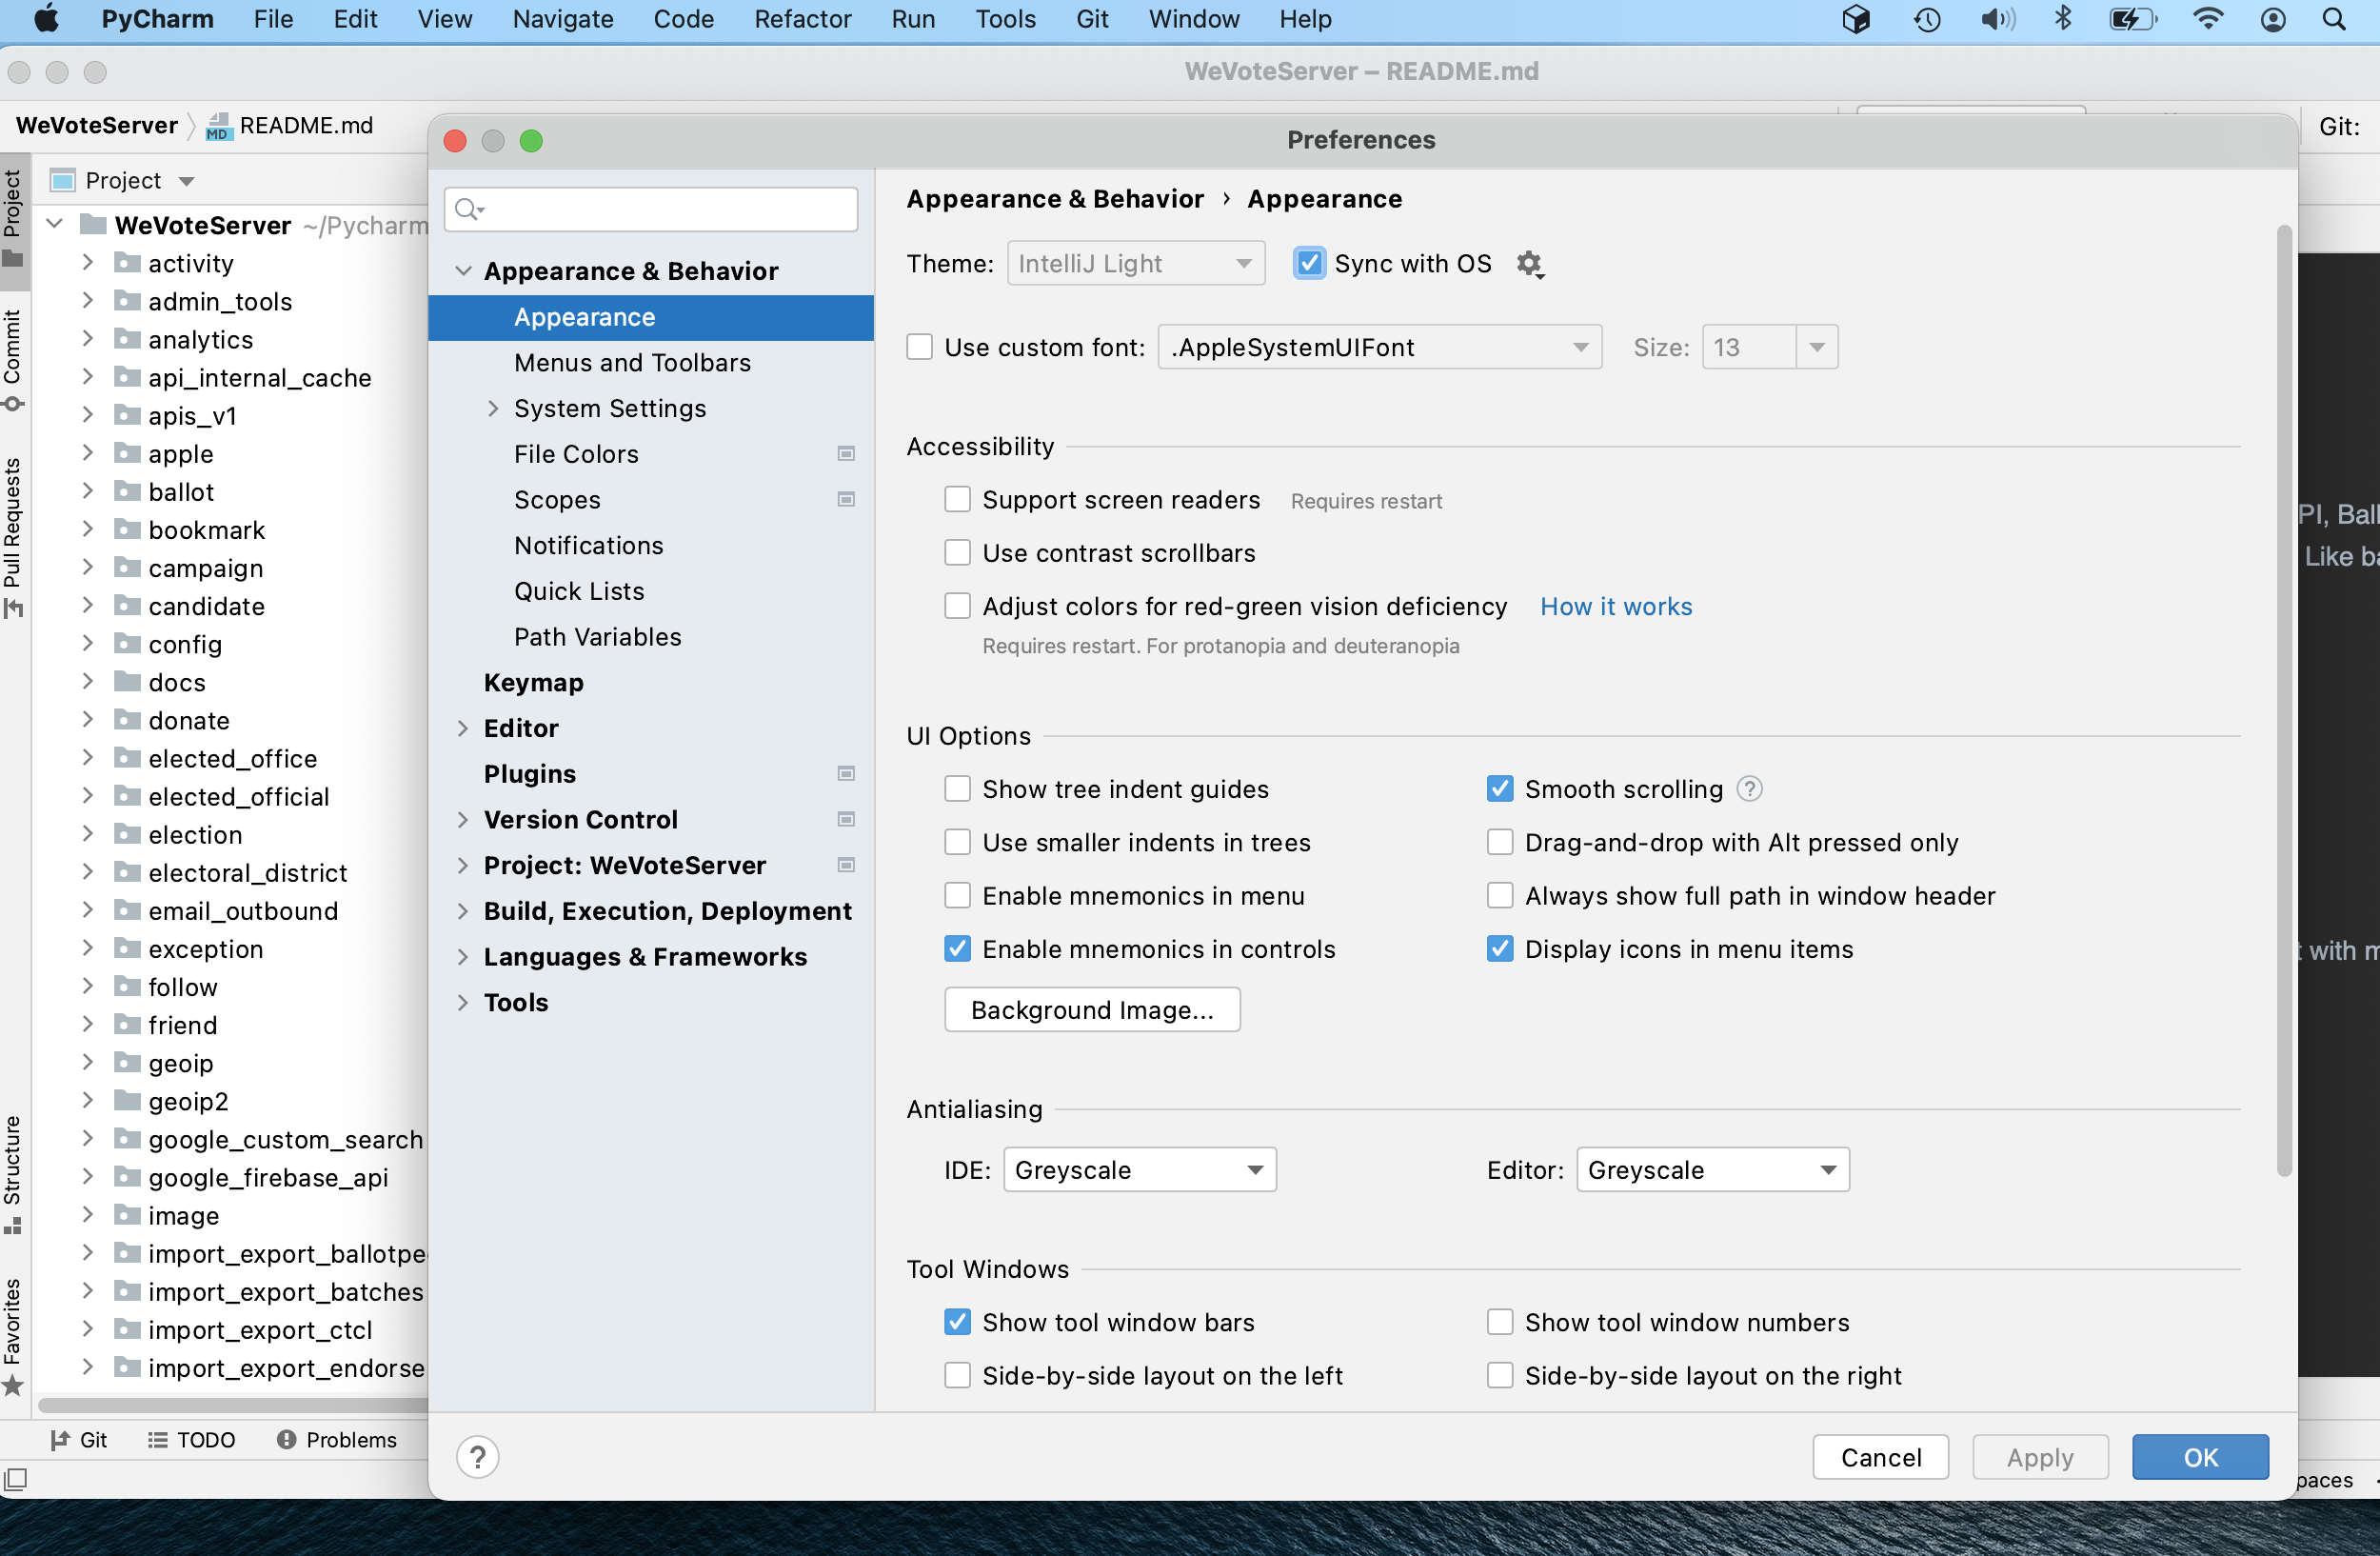
If you like 'Dracula' mode, you can skip this step. Open PyCharm/Settings and press the 'Sync with OS' button to match the display mode of your Mac.

-
In PyCharm/Settings/Plugins enable the IdeaVim tool (this takes a while).
Feel free to add any other PyCharm tools that you would like! When done press 'Ok', and the IDE will reboot.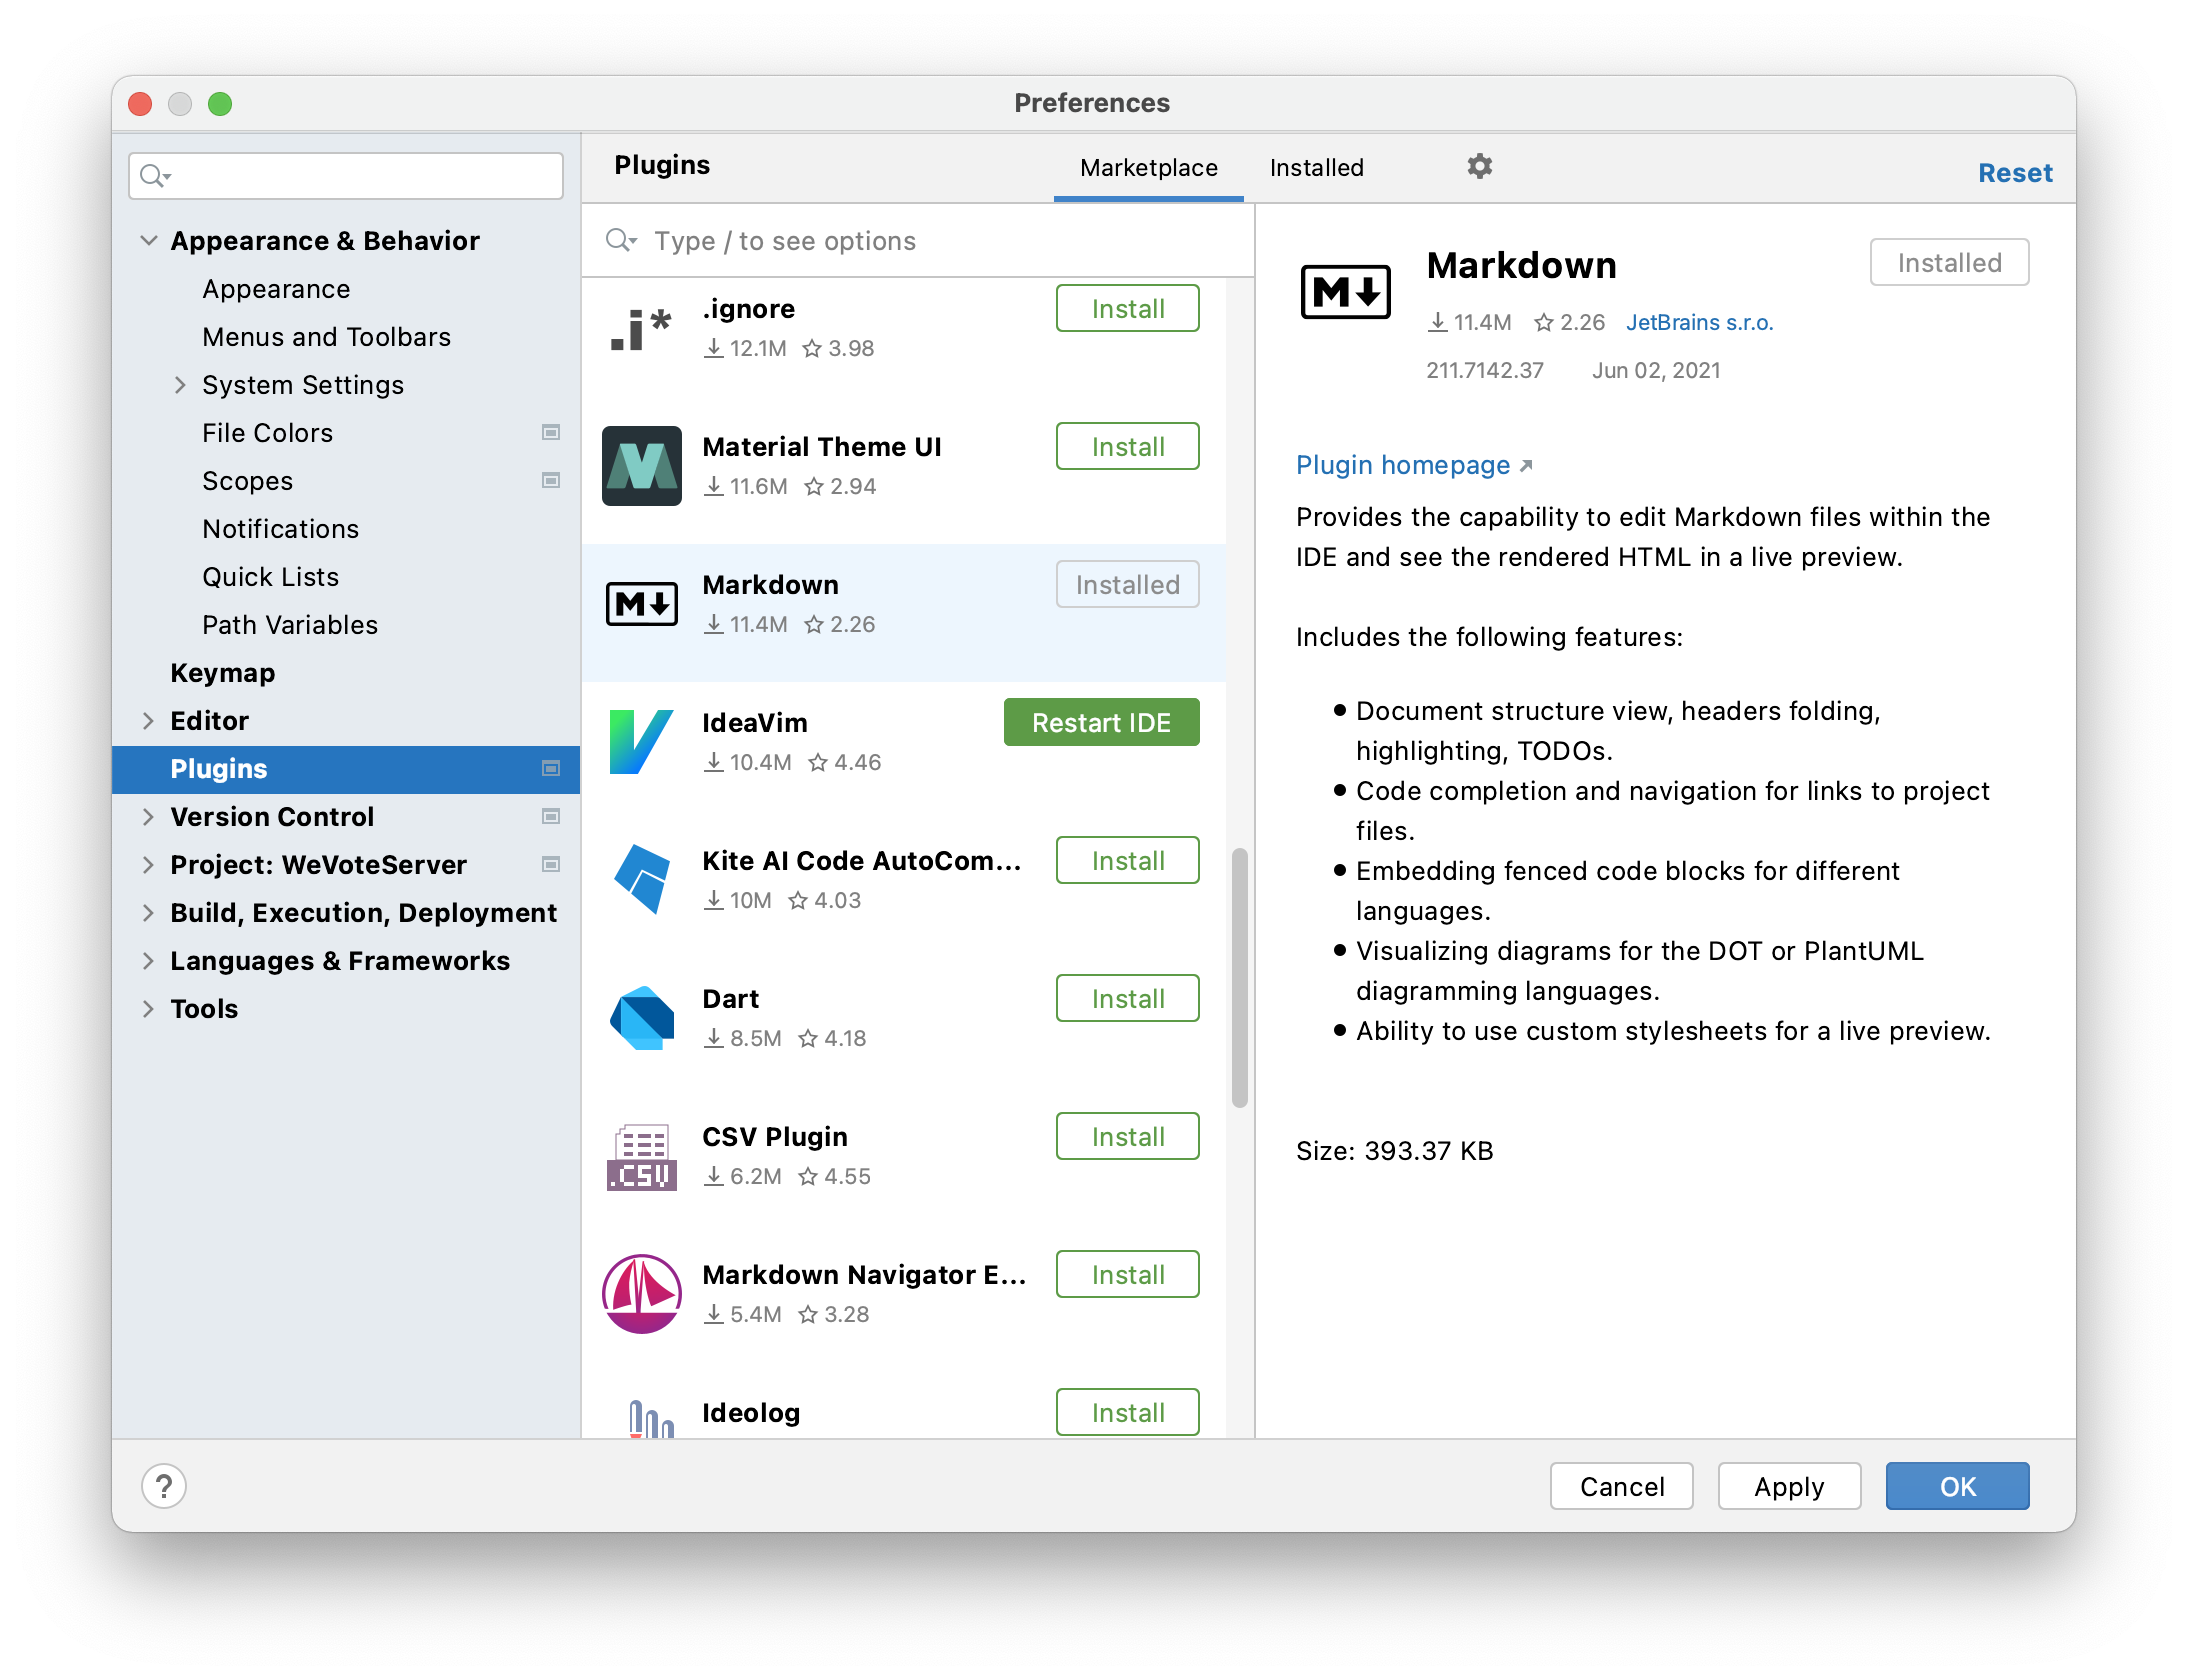
-
If you are using one of the newer Macs with Apple Silicon processor, the installer offers the "Apple Silicon Version" which is better and more stable -- take it if it is offered!
-
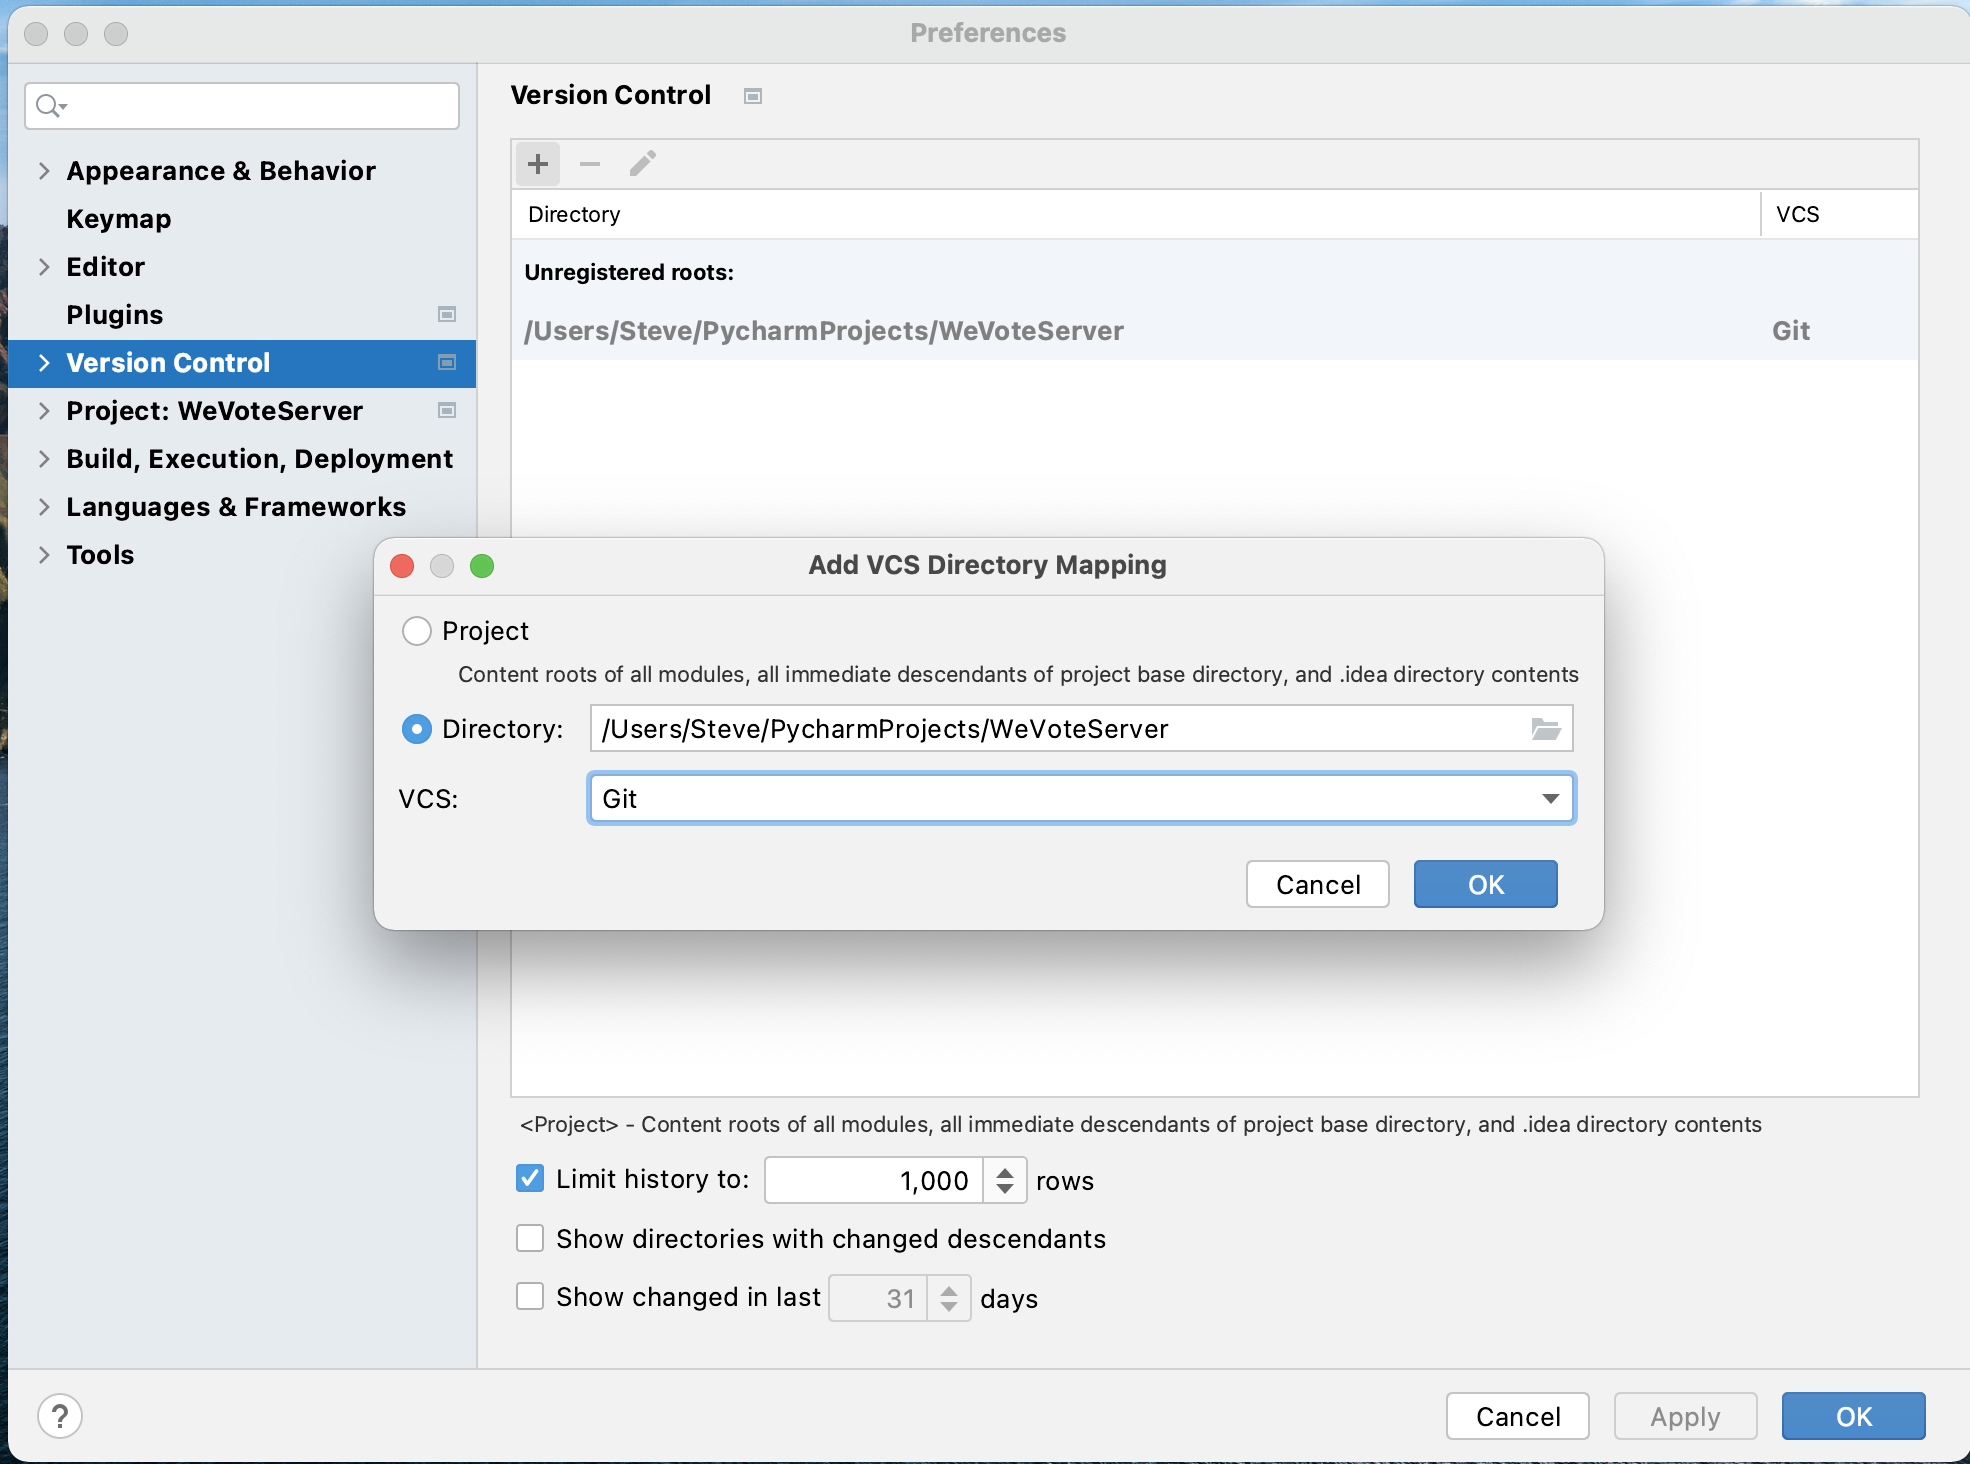
If the Apple top menu, shows "Git" skip this step. If it says "VCS", the follow this step to configure Git

Select 'Git' on the VCS meu, and press Ok.
-
In PyCharm set your git remotes. Navigate to the Git/'Manage Remotes...' dialog (July 2022: these two images might be reversed! (Verify!) But the results in the next step are corect.)
The WeVoteServer project defines upstream and origin differently than most projects.
Click the edit (pencil) icon, and change the word origin to upstream. This is how it looks after the change.
-
Then add a remote for your private branch by pressing the '+' button on the Git Remotes dialog. Add the url for your fork of the WeVoteServer project origin (copy the url from the GitHub website). In this example, the developer is "SailingSteve".
-
When the cloning is complete, it will look something like this.
Press Ok to close the dialog
-
In PyCharm copy
environment_variables-template.jsontoenvironment_variables.jsonRight click on
environment_variables-template.jsonand select 'Copy', then right click paste on theconfigdirectory and select 'Paste' in the pop-up, and then in the copy dialog that open up, and change the "new name:" toenvironment_variables.jsonIf you skip this step, in a much later step, when you run "makemigrations", it will fail with an 'Unable to set the **** variable from "os.environ" or JSON file' error.
There are a number of secret values in
environment_variables.jsonthat are not in source control, you will need to check in with Dale, as you find that you need them. -
In PyCharm, open the Terminal window and accept use of the z shell (if you want to use some other shell, feel free to skip this step).
The terminal opens up with the project root directory set as the pwd (which is handy).
-
In the PyCharm terminal window download Homebrew ("the missing package manager for macOS") by entering the following command:
$ /bin/bash -c "$(curl -fsSL https://raw.GitHubusercontent.com/Homebrew/install/master/install.sh)"This loads and runs a Ruby script (Ruby comes pre-installed in macOS), and Ruby uses curl (also pre-loaded) to pull the file into the bash (terminal) command shell for execution. This Ruby script also internally uses 'sudo' which temporarily gives the script root privileges to install software, so you will need to know an admin password for your Mac.
This script can take a few minutes to complete.
-
Install the latest version of Python
$ brew install python(As of May 2024) This should have installed Python 3.11 If an older version of Python has been installed, and the installation fails, you will see the following error:
Error: [email protected] 3.9.1_1 is already installed
To upgrade to 3.11.4, run:
  brew upgrade [email protected]
Steve@Vickies-MacBook-Pro-2037 WeVoteServer %
In which case you run the suggested upgrade command, in this example it would be
brew upgrade [email protected], then finally export the path as shown below.$ export PATH="/usr/local/opt/python/libexec/bin:$PATH" -
Test that the newly installed Python is in the path. macOS comes with Python 2 preinstalled, so if the reported version is 2, then add the newly loaded python to the path with the export command. Then confirm that the default python is now version 3.11 or later.
stevepodell@Steves-MBP-M1-Dec2021 WeVoteServer % python --version Python 2.7.18 stevepodell@Steves-MBP-M1-Dec2021 WeVoteServer % export PATH="/opt/homebrew/opt/[email protected]/libexec/bin:$PATH" stevepodell@Steves-MBP-M1-Dec2021 WeVoteServer % python --version Python 3.13.1 stevepodell@Steves-MBP-M1-Dec2021 WeVoteServer % -
If python --version fails, try
ln -s /opt/homebrew/bin/python3 /opt/homebrew/bin/python
needed to install postgres before the requirements because psyco3-3 binary requires pg_config which is not installed yet.
-
Set up a Virtual Environment with the new Python Interpreter.
Navigate to: PyCharm/Settings/Project: WeVoteServer/Python Interpreter.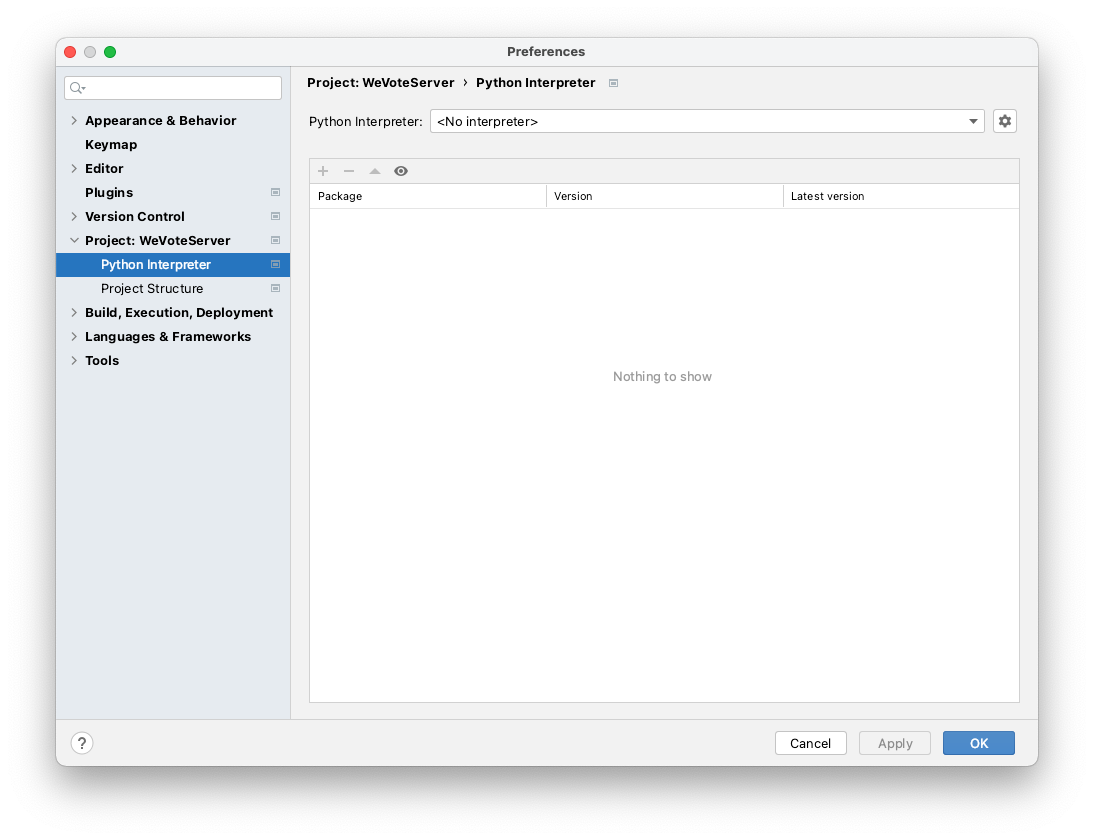
-
Click the Gear icon, then select "Add", then choose "Add Local Interpreter". PyCharm will detect the latest interpreter from the PATH environment variable, and pre-populate the dialog. Check the two checkboxes
Inherit global site-packagesandmake available to all projects.
Confirm that the 'Base interpreter' field shows us using the Python version that you just downloaded, and it knows the location for pip, setuptools, and wheel (3 python utilities). Then press Ok.
-
Confirm that the new virtual environment is in effect, by closing all open Terminal windows within PyCharm and opening a new one.

If you see '(venv)' at the beginning of the command line, all is well.
-
Install OpenSSL, the pyopenssl and https clients:
(3.11.8) $ brew install opensslIf it is already installed, no worries! -
Link libssl and libcrypto so that pip can find them. If this step fails you can continue with the rest of the installation:
$ ln -s /usr/local/opt/openssl/lib/libcrypto.dylib /usr/local/lib/libcrypto.dylib $ ln -s /usr/local/opt/openssl/lib/libssl.dylib /usr/local/lib/libssl.dylib -
Install libmagic. If this fails you can continue with the rest of the installation:
(3.11.8) $ brew install libmagic -
Install all the other Python packages required by the WeVoteServer project (there are a lot of them!)
(3.11.8) $ pip3 install -r requirements.txtThis is a big operation that loads a number of wheels definitions and then compiles them. Wheels are linux/macOS binary libraries based on c language packages and compiled with gcc. Wheels allow python library developers to speed up execution by coding critical or complex sections the c language. Interpreted Python code runs slower than compiled c.
Note July 2022 if this fails due to
psycopg2-binaryrequiringpg_config(which is installed with postgres), install Postgres first then come back and do the pip3 install -r requirements.txt` command.If this installation succeeds with no missing libraries, or other compiler errors, we are almost done. If this installation fails, you might need to comment out all lines in the requirements.txt file that have the comment
# recommend engineon the end of the line, and then run the command above again.
-
If you are sure that Postgres has not already been installed, and is not currently running on this Mac, you can skip this step. To see if postgres is already running, check with lsof in a terminal window
lsof -i -P | grep -i "listen" | grep postgres:lsof -i -P | grep -i "listen" | grep postgresResults:
postgres  13254 admin    5u  IPv6 0x35032d9cf207f247      0t0  TCP localhost:5432 (LISTEN)
postgres  13254 admin    6u  IPv4 0x35032d9d01cd2647      0t0  TCP localhost:5432 (LISTEN)
If the output shows postgres has already been installed and is listening on port 5432. Stop and fix this,
otherwise you would install a second postgres instance running on port 5433, and the result would be hours of "port assignment" mess to clean up.brew services stop postgresqlIf that lsof line returns nothing, then you don't currently have postgres running, and you can continue on to the next step.
or
If you don't mind fully deleting any Postgres database data that you have already installed, then delete the existing Postgres now. If you installed postgres with homebrew try
brew uninstall postgresql, but if that fails Postgres can be setup in many ways, so there are no detailed instructions here on how to delete Postgres (but. You can start with runningwhich postgresin a terminal and going to that directory and deleting the instance or the symbolic links to the instance.
Next step is to reboot your Mac to see if Postgres starts up again.or
If you have to keep some data that is already stored in the Postgres instance on your Mac that you absolutely need to retain, then you will need to manually upgrade Postgres. This is a ton of work, and is rarely necessary.
-
Install PostgreSQL by running the following command:
brew install postgresql -
Start PostgreSQL (this is actually instructing the macOS launchd to start Postgres every time you start your Mac):
brew services start postgresql -
Create a default database, and a default user, and then log into the 'psql postgres' PostgreSQL command interpreter ("postgres=#" is the command prompt, you should not have to type this in):
New way: November 2021, using Postgres 14.0 TODO 7/8: CREATE ROLE postgres WITH SUPERUSER CREATEDB CREATEROLE LOGIN ENCRYPTED PASSWORD ‘stevePG’;
(PycharmEnvironments) stevepodell@Steves-MacBook-Pro-32GB-Oct-2109 ~ % psql postgres
psql (14.0)
Type "help" for help.

postgres=# createuser -s postgres;
postgres=# \du
                                    List of roles
  Role name  |                         Attributes                         | Member of
-------------+------------------------------------------------------------+-----------
 stevepodell | Superuser, Create role, Create DB, Replication, Bypass RLS | {}

postgres=# create database WeVoteServerDB;
CREATE DATABASE
postgres=# grant all privileges on database WeVoteServerDB to postgres;
GRANT
postgres=# \l
                                    List of databases
      Name      |    Owner    | Encoding | Collate | Ctype |      Access privileges
----------------+-------------+----------+---------+-------+-----------------------------
 WeVoteServerDB | stevepodell | UTF8     | C       | C     |                   (TODO 7/8/22 these don't match the latest setup)
 postgres       | stevepodell | UTF8     | C       | C     |
 template0      | stevepodell | UTF8     | C       | C     | =c/stevepodell             +
                |             |          |         |       | stevepodell=CTc/stevepodell
 template1      | stevepodell | UTF8     | C       | C     | =c/stevepodell             +
                |             |          |         |       | stevepodell=CTc/stevepodell
 wevoteserverdb | stevepodell | UTF8     | C       | C     | =Tc/stevepodell            +
                |             |          |         |       | stevepodell=CTc/stevepodell+
                |             |          |         |       | postgres=CTc/stevepodell
(5 rows)
postgres=#
brew created a superuser 'stevepodell' with no password, you can add a password within psql if you wish.
old way ...
(venv) $ createdb
(venv) $ createuser -s postgres
(venv) $ psql
psql (11.1)
Type "help" for help.

admin=#
The
psqlcommand starts a PostgresSQL command session which is started in the bash terminal window. Within this PostgresSQL command session type the following Postgres commands... ("admin" is just an example password, use whatever password you would like to go with your postgres role name.)admin=# ALTER USER postgres WITH PASSWORD 'admin'; ALTER ROLE admin=# \du List of roles Role name | Attributes | Member of -----------+------------------------------------------------------------+----------- admin | Superuser, Create role, Create DB, Replication, Bypass RLS | {} postgres | Superuser, Create role, Create DB | {} admin-# \q (venv) $That
\ducommand confirms that we have a 'postgres' role. The\qcommand quits psql. -
Now you are ready to install pgAdmin4 (a powerful WYSIWYG database administration tool that is open source and built by volunteers (Many thanks to the pgAdmin team!)). Run:
(venv) $ brew install --cask pgadmin4This can take a few minutes to complete. When
brew install --cask pgadmin4finishes, it prints outMoving App 'pgAdmin 4.app' to '/Applications/pgAdmin 4.app'.The latest pgAdmin4 has a webapp architecture (it is not a compiled program). The app you start from the Application folder is actually a single purpose web server, and the UI for the app appears. (7/8/22 needs a new )
-
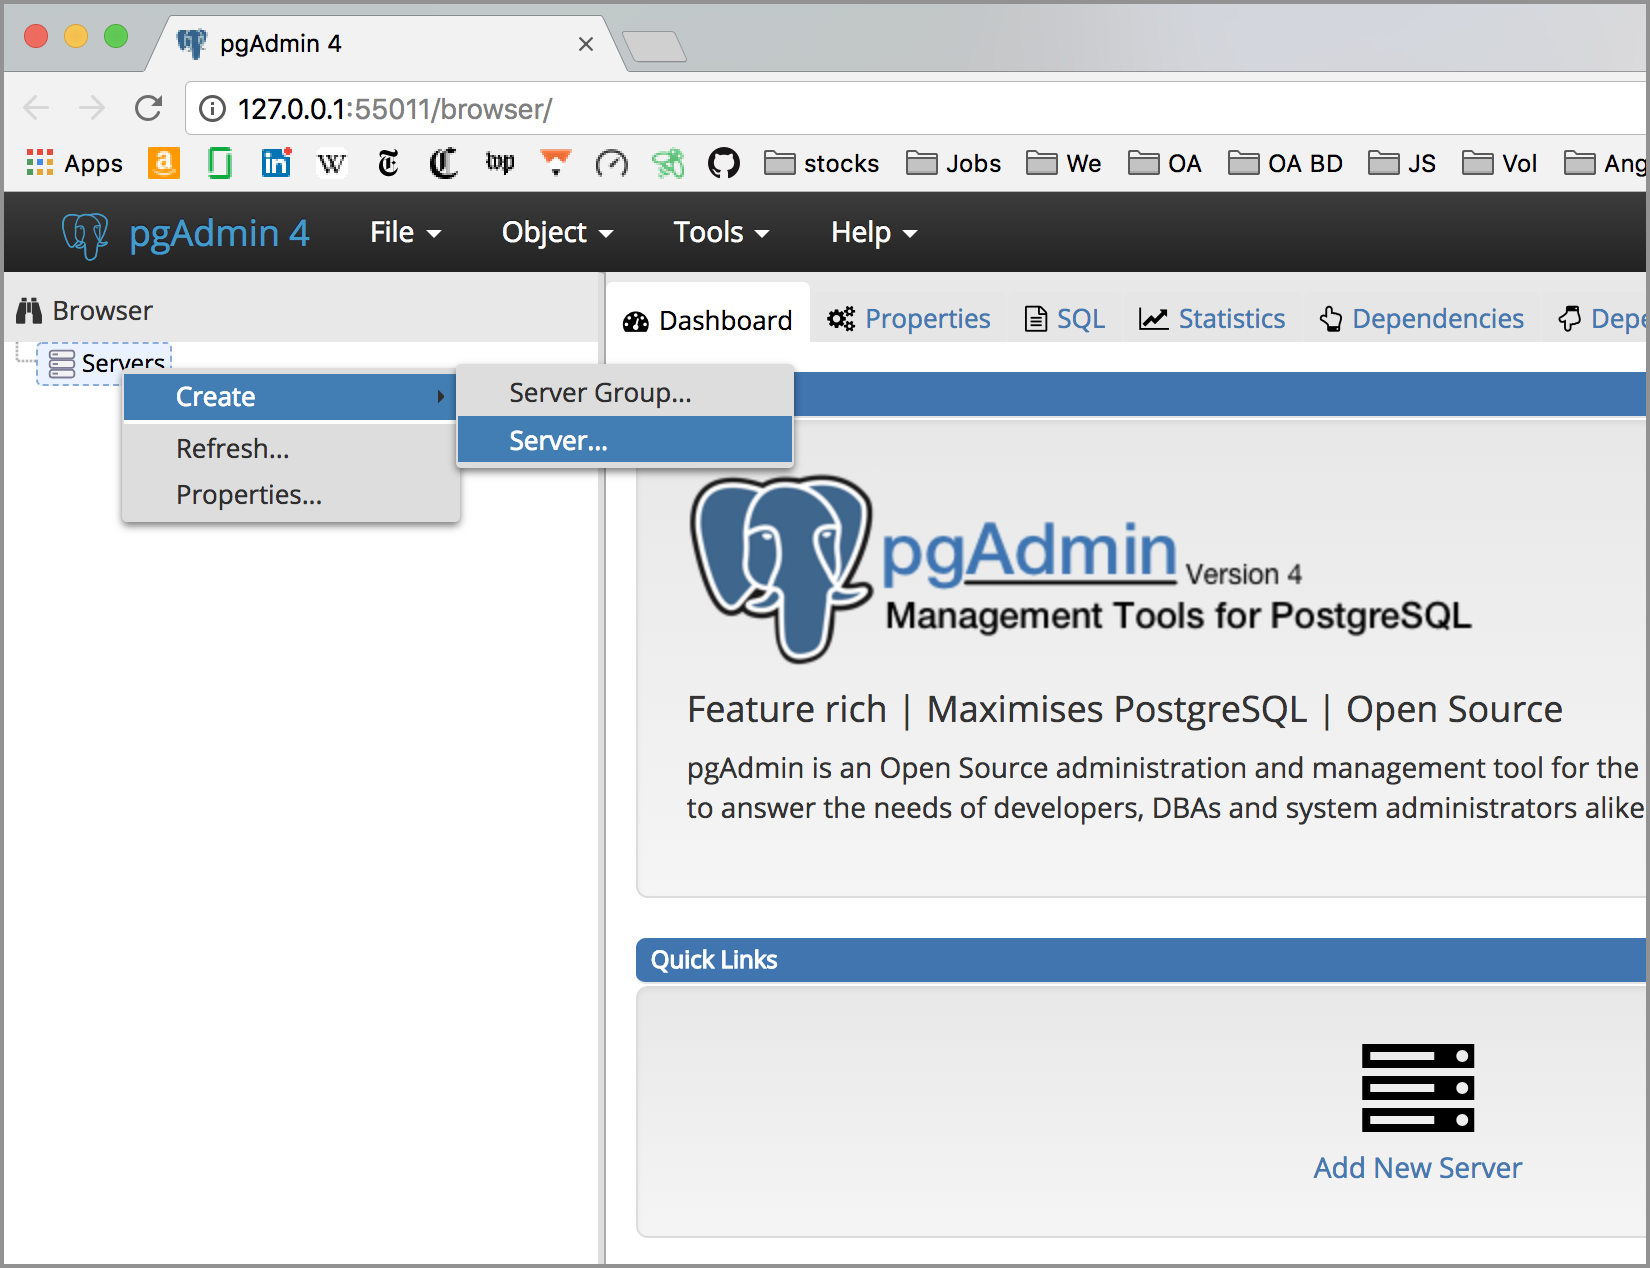
Use Spotlight to find and launch the pgAdmin4 app. Once launched, the pgAdmin4 webapp will display in a new tab within Chrome. On that new tab, click on the "Add new Servers" button and choose "Create > Server"
-
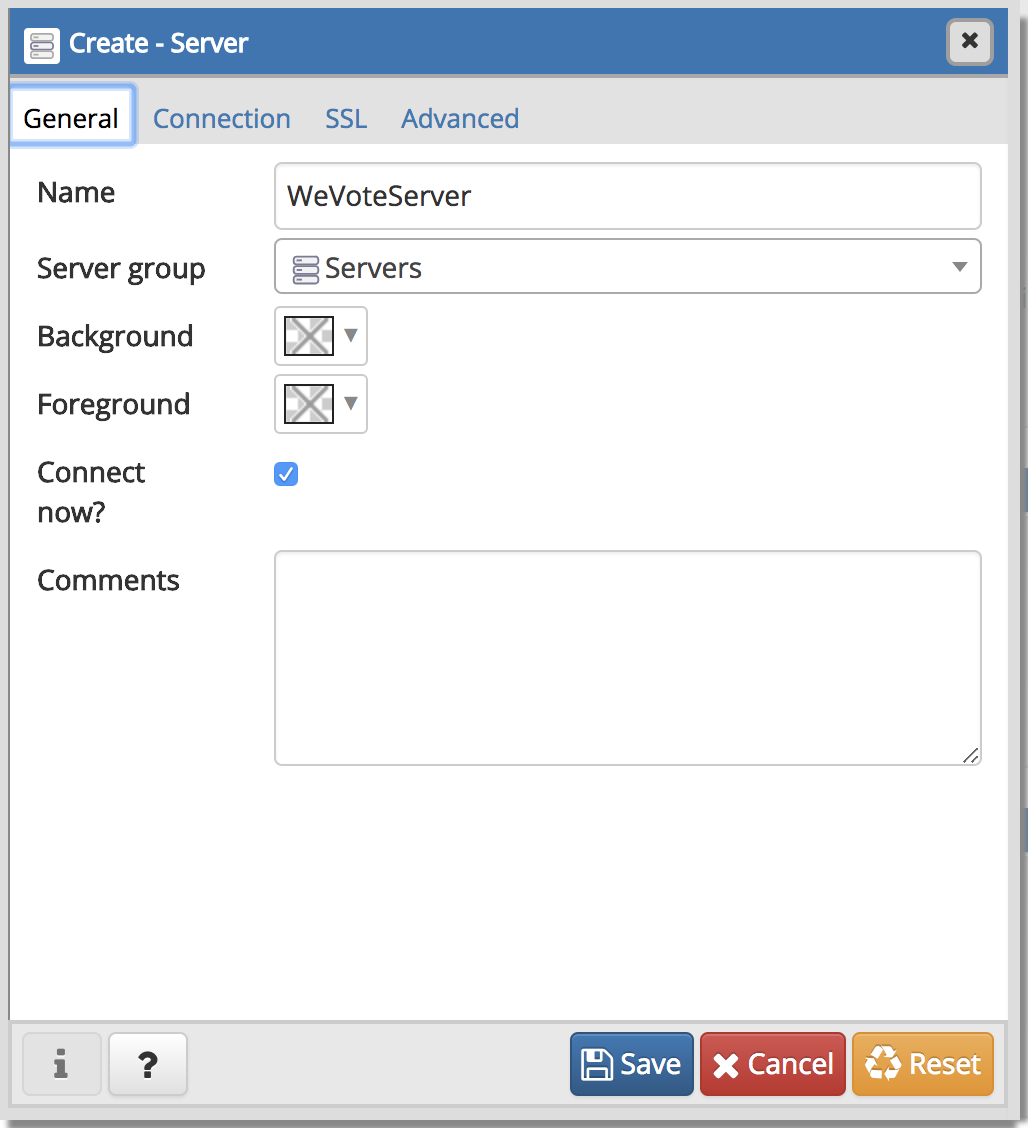
On the first tab of the "Create - Server" dialog, add into the Name field: WeVoteServer
-
Switch to "Connection" tab, and enter the following information:
- Host name: localhost
- Port: 5432
- Maintenance database: postgres
- User name: postgres
- Password: (mine is stevePG)
- Save password: checked
-
Press Save
-
Create the Database by right-clicking on Databases in the server tree on the left. Then select
Create > Database on the cascading menu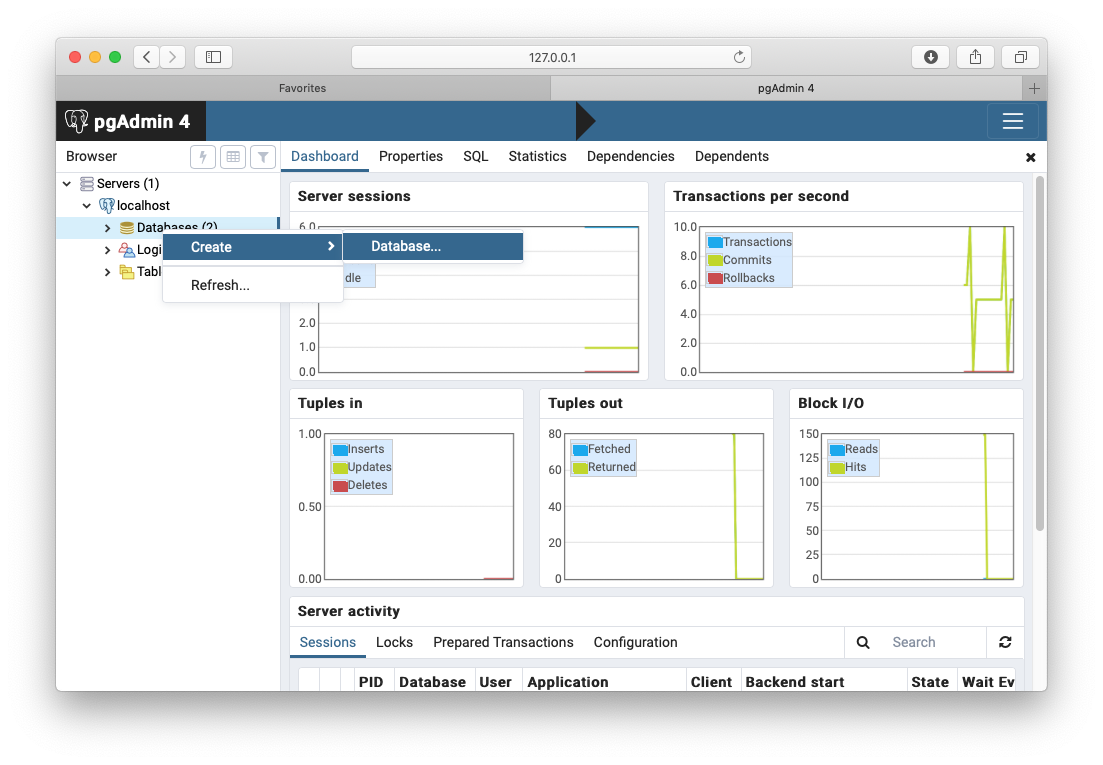
-
Name the new database WeVoteServerDB and press save.
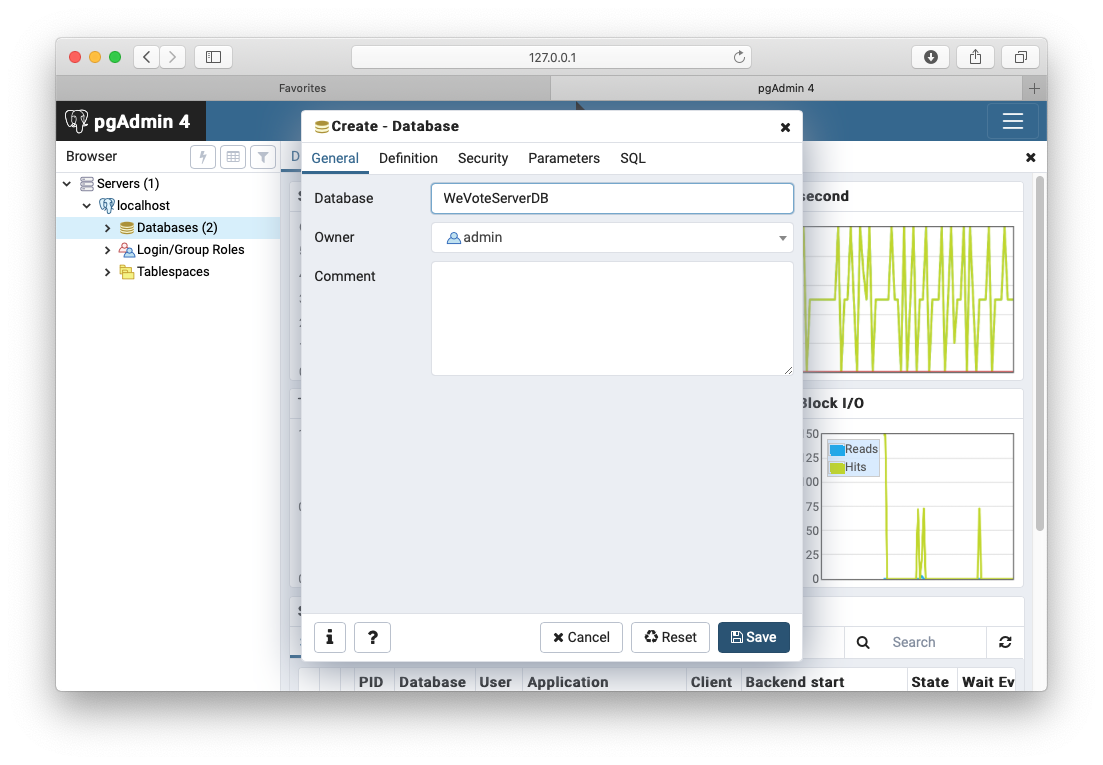
-
Create an empty log file on your computer to match the one expected by the app as configured in the environment_variables.json file:
(venv) $ sudo mkdir /var/log/wevote/
(venv) $ sudo touch /var/log/wevote/wevoteserver.log
(venv) $ sudo chmod -R 0777 /var/log/wevote/
As configured by default in our configuration code from GitHub, only errors get written to the log. Logging has five levels: CRITICAL, ERROR, INFO, WARN, DEBUG. It works as a hierarchy (i.e., INFO picks up all messages logged as INFO, ERROR and CRITICAL), and when adding logging code we specify the level assigned to each message. You can change this to info items by changing the LOG_FILE_LEVEL variable in the WeVoteServer/config/environment_variables.json file to "INFO".
Note: Logging slows down Python app execution in production, so only use it for very important or very rarely used code or code that is only used by the admin pages by developers. You can also write your log files at the DEBUG level, and then they won't execute on the production server.
-
"Migrations are Django’s way of propagating changes you make to your software models into your local postgres database schema." Everytime you create a table, change a field name or description, you are changing the model, and those changes need to be incorporated into the on-disk database schema.
Run 'makemigrations' to gather all the schema information that is needed to initialize the WeVoteServer database:
(venv) $ python manage.py makemigrations
(venv) $ python manage.py makemigrations wevote_settings
(January 28, 2019: that second makemigrations for the wevote_settings table should not be necessary, but as of today, it is necessary. That second makemigrations line will be harmless, if it becomes unnecessary at some point.)
-
Run 'migrate'. Django "migrate is responsible for applying and un-applying migrations."
(venv) $ python manage.py migrate
-
Set up a run configuration (this will enable the green play button, and the green debug button on the top line)
Click in the "Add Configuration..." field that is to the left of the play button.

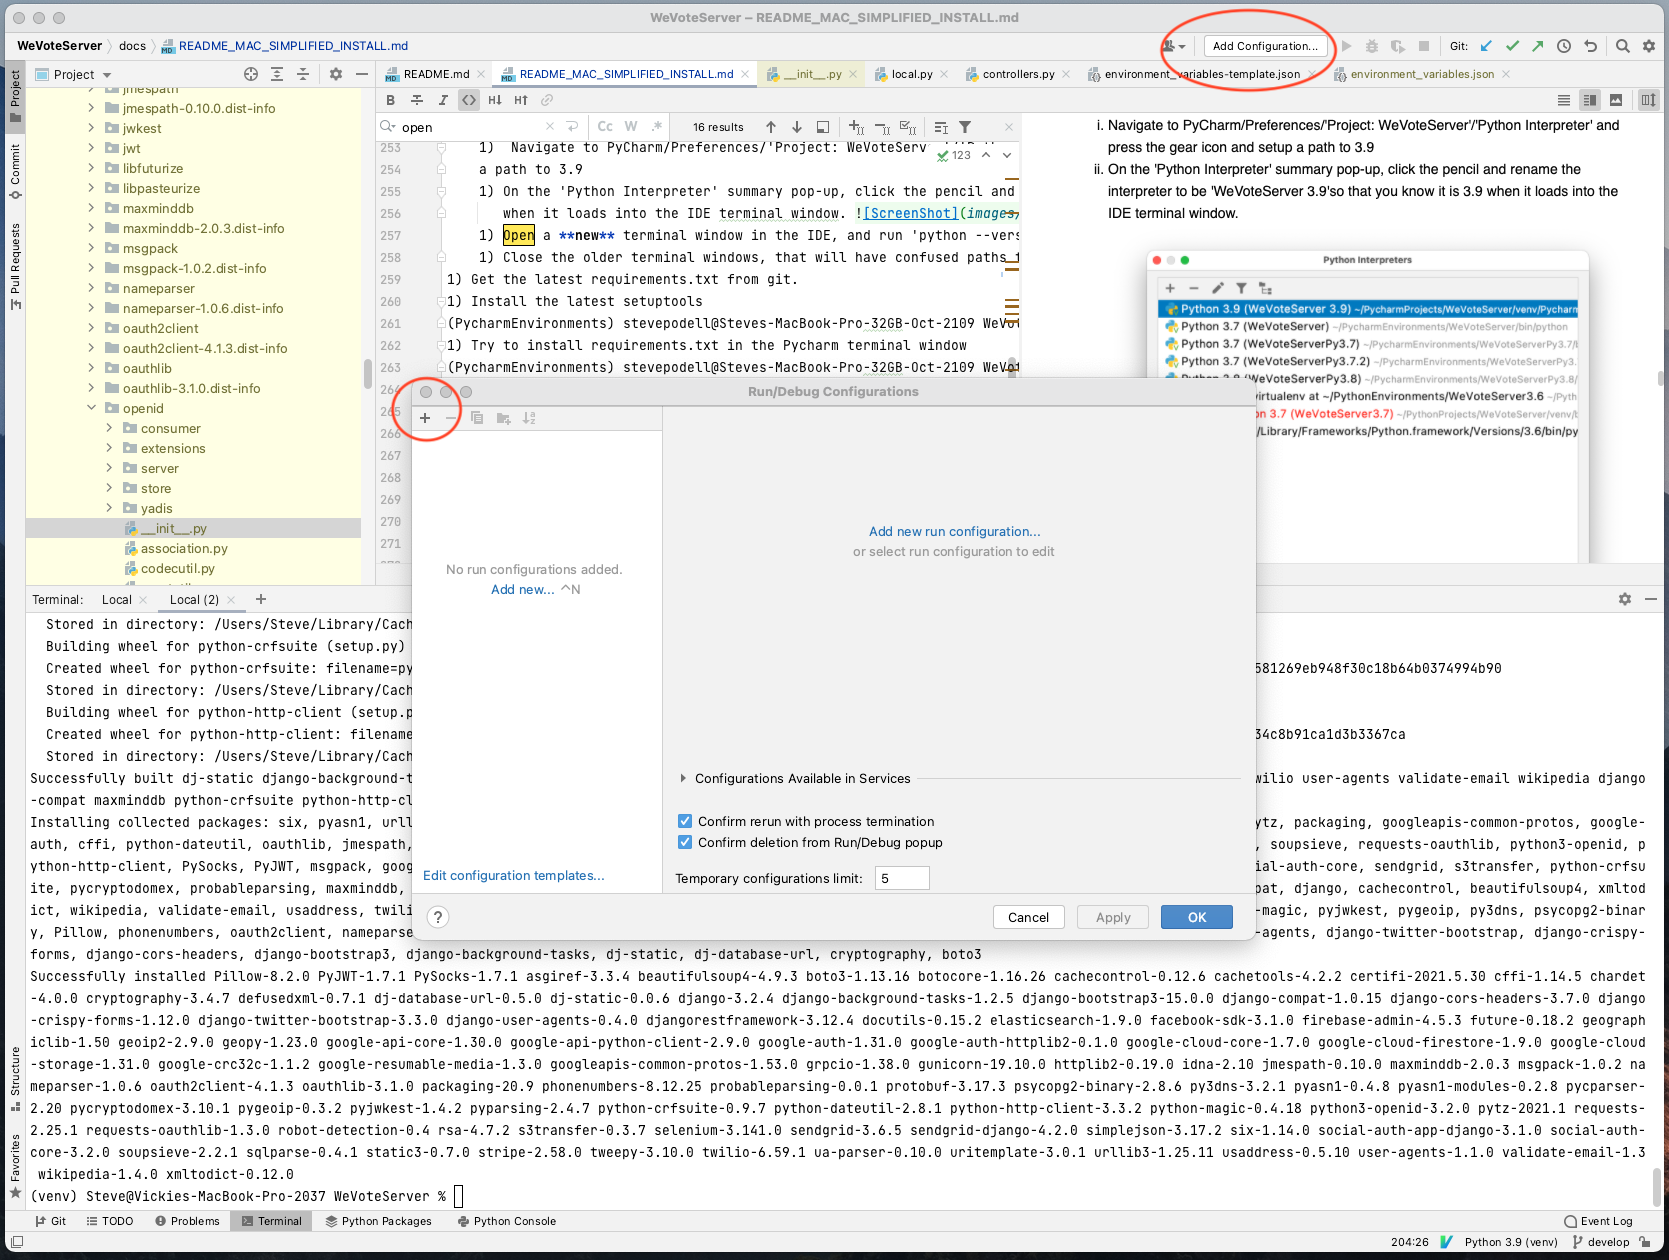
Press the '+' sign in the upper-left corner of the dialog.
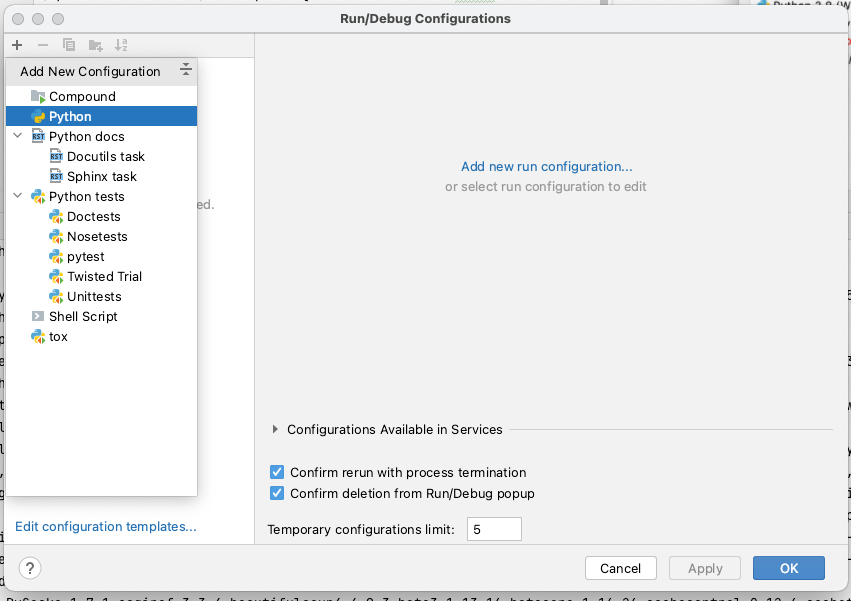
Then select Python, and click 'Add new run configuration...'
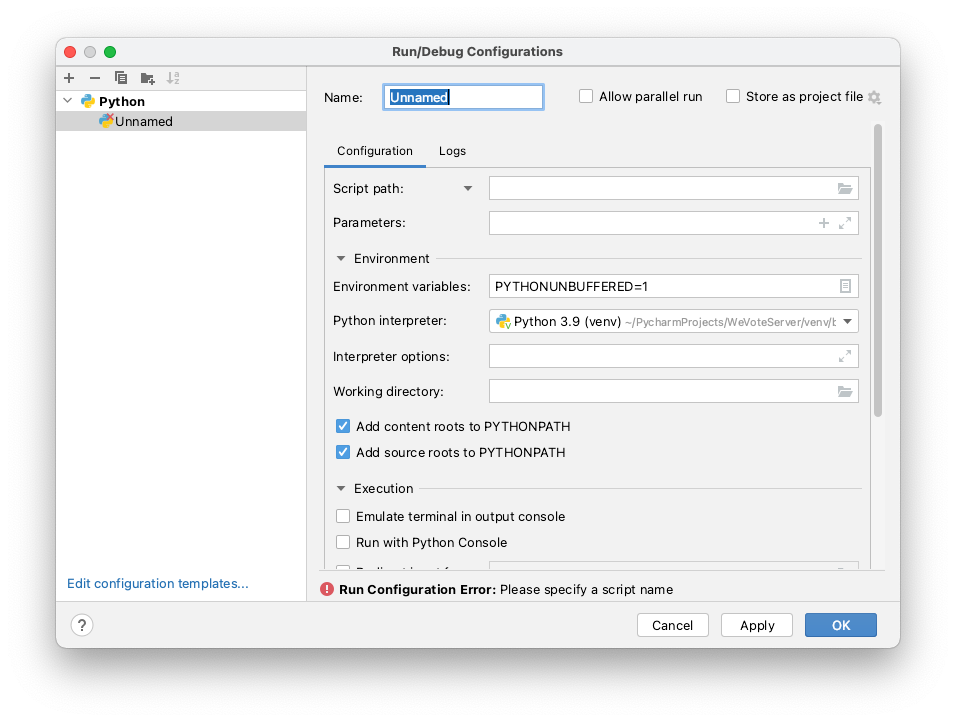
For "Script path", add the path to your
manage.pyfile that will be in your project root directory, and for "Parameters" addrunserveras the command.
Then press "Ok".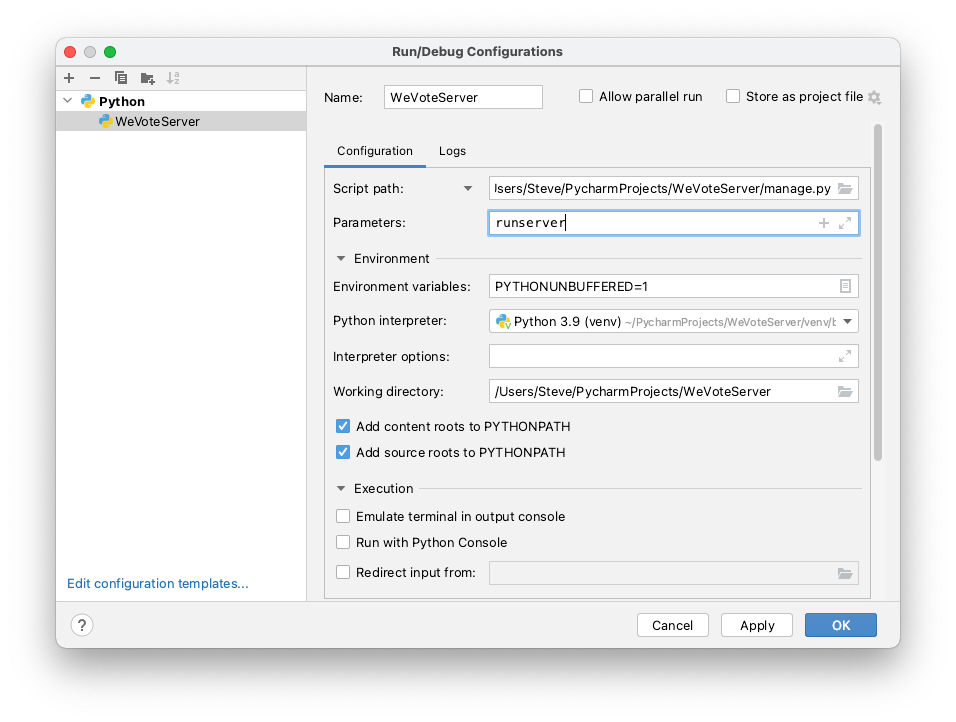
-
Run the app: Press the triangular Run button on the top line of the ide. Note that a run window opens at the bottom of the IDE, on the same line as the "Terminal" tab. As API calls arrive at the server, the http requests will be displayed in this runtime log.
Python print commands, only send their output to this log. Python logger commands send the output to both this runtime log, and the log file that we created a few steps back. On the production servers in AWS, these log lines can be searched using the AWS CloudWatch console (ask Dale for CloundWatch access if you need it.)
-
Now, create an account for yourself to login to the management pages of the WeVoteServer.
At WeVote, we call end users "voters".
The usage is:
python manage.py create_dev_user first_name last_name email password(3.11.8) stevepodell@Steves-MBP-M1-Dec2021 WeVoteServer % python manage.py create_dev_user Samuel Adams [email protected] ale Creating developer first name=Samuel, last name=Adams, [email protected], password =ale End of create_dev_user (3.11.8) stevepodell@Steves-MBP-M1-Dec2021 WeVoteServer %This new "voter" will have all the rights that you (as a developer) need to log in to http://localhost:8000/admin/. Once logged in you can start synchronizing data (downloading ballot and issue data from the master server in the cloud, to your local server).
-
Navigate to http://localhost:8000/admin/ and sign in with your new username/password. (in the example above the user email is
[email protected]and the password isale). -
Your local instance of the WeVoteServer is now setup and running (although there is no election data stored in your Postgres instance, for it to serve to clients at this point).
Make sure you have given yourself admin privileges. When you run the following command, enter your email address and a simple password. This admin account is only used in development.
python manage.py createsuperuser
Find the "Sync Data with Master We Vote Servers" link, and click it: http://localhost:8000/admin/sync_dashboard/
Start by clicking the Fast Load Data From We Vote Master Servers button.
The fast loading will take somewhere in the range of 40 to 80 minutes to complete. It will copy about 30 tables from the Master database in AWS, to your local database, which will allow you to run the api server software locally.
You are now done installing your local server
The following step is optional, most developers will not need it.
You only need to do this if you are going to be working on Login with Facebook or Stripe Donations
If you have not created a secure certificate to run WebApp on your Mac in SSL/HTTPS mode, do this first
The following link takes you to a page in the WebApp docs, you will have to manually navigate back here when you are done.
Facebook will no longer redirect to localhost and it also won't redirect to a http link, so these changes are necessary.
Make a second alias for 127.0.0.1 with this made up (but standardized for We Vote developers) domain: wevotedeveloper.com
Explanation from the python-social-auth docs: "If you define a redirect URL in Facebook setup page, be sure to not define http://127.0.0.1:8000 or http://localhost:8000 because it won’t work when testing. Instead I define http://wevotedeveloper.com and setup a mapping on /etc/hosts."
First we have to make a small change to /etc/hosts. This is the before:
    (venv2) stevepodell@StevesM1Dec2021 WeVoteServer % cat /etc/hosts
    ##
    # Host Database
    #
    # localhost is used to configure the loopback interface
    # when the system is booting.  Do not change this entry.
    ##
    127.0.0.1       localhost
    255.255.255.255 broadcasthost
    ::1             localhost
    (venv2) stevepodell@StevesM1Dec2021 WeVoteServer %
Add a local domain alias wevotedeveloper.com for the Facebook Valid OAuth Redirect URIs.
To do this you need to add wevotedeveloper.com to your 127.0.0.1 line in /etc/hosts. After the change:
    (venv2) stevepodell@StevesM1Dec2021 WeVoteServer % cat /etc/hosts
    ##
    # Host Database
    #
    # localhost is used to configure the loopback interface
    # when the system is booting.  Do not change this entry.
    ##
    127.0.0.1       localhost wevotedeveloper.com
    255.255.255.255 broadcasthost
    ::1             localhost
    (venv2) stevepodell@StevesM1Dec2021 WeVoteServer %
You will need to elevate your privileges with sudo to make this edit to this linux system file ... % sudo vi /etc/hosts You can do with any other editor that you would prefer, as long as it can be run with sudo.
Note July 2022: The auto generated certificate that is made by runsslserver generates warnings in browsers (not really a problem), but may stop the JavaScript builtin fetch() function from completing. The browser extension has to use fetch.
In your environment_variables.json
replace all (6) urls that contain http://localhost:8000/ (or 8001), with https://wevotedeveloper.com:8000/
(Explanation at https://github.com/teddziuba/django-sslserver)
Then start an SSL-enabled debug server:
or if you prefer the command line ...
$ python manage.py runsslserver wevotedeveloper.com:8000
and access the API Server Python Management app on https://wevotedeveloper.com:8000
The first time you start up the runsslserver the app may take a full minute to respond to the first request.
That's it!
You will also need to have your WebApp running in SSL mode, on https://wevotedeveloper.com:3000
Find one of those failing links in the Network, and click it, to open in a new tab, then follow the same procedure that you would follow for any invalid certificate. The details of how you do this changes over time, but in general on the chrome error screen that you see, follow the links for viewing the page anyways. Once you have done that the problem will go away.
In order to speed up signin with facebook, we removed the scaling and saving of the facebook profile image from in-line in to having them be executed in parallel so that the sign-in occurs much quicker for the voter.
Gunicorn, the application server that the Python API Server runs in production, does not handle threads well, so instead we run them in a queue in a seperate process. We use the AWS SQS queue manager to queue up the processing requests that potentially could be coming in from multiple Voters, and execute them in a full image of the WeVote API Server.
In order to run all these AWS features locally on your Mac, do the following:
- Download the docker CLI from https://docs.docker.com/desktop/install/mac-install/
- Find the downloaded file, and substitute your Downloads path into following set of commands
(venv2) WeVoteServer % sudo hdiutil attach '/Users/stevepodell/Downloads/Docker (1).dmg' (venv2) WeVoteServer % sudo /Volumes/Docker/Docker.app/Contents/MacOS/install (venv2) WeVoteServer % sudo hdiutil detach /Volumes/Docker - MacOS modal dialog that appears, allow docker to make some symbolic links -- allow this.
- Once the Docker Desktop starts, and shows as running, typing 'docker -v' at the command line, to confirm that the CLI portion is running
(venv2) stevepodell@StevesM1Dec2021 tmp % docker -v Docker version 20.10.21, build baeda1f (venv2) stevepodell@StevesM1Dec2021 tmp % - Check to see if awslocal is installed
( venv2) stevepodell@StevesM1Dec2021 WeVoteServer % awslocal --version aws-cli/2.9.13 Python/3.11.4 Darwin/22.3.0 exe/x86_64 prompt/off (venv2) stevepodell@StevesM1Dec2021 WeVoteServer % - if aws (awslocal) is not available at the command line, follow instructions at https://docs.aws.amazon.com/cli/latest/userguide/getting-started-install.html#getting-started-install-instructions
- Check to see if you have localstack installed
(venv2) stevepodell@StevesM1Dec2021 WeVoteServer % localstack --version 1.3.1 (venv2) stevepodell@StevesM1Dec2021 WeVoteServer % - If you do not already have localstack installed
pip install localstack localstack-client awscli-local - Start localstack
localstack start -d - Wait for sqs service to launch
- Create a sqs queue, and copy the QueueUrl it reports to environment-variables.json
awslocal sqs create-queue --queue-name job-queue.fifo --attributes FifoQueue=true,ContentBasedDeduplication=true - Make sure the QueueUrl displayed matches AWS_SQS_WEB_QUEUE_URL in the config file environment-variables.json
It is likely to look like this...
"AWS_SQS_WEB_QUEUE_URL": "http://localhost:4566/000000000000/job-queue.fifo", - Then start the queue processing code (in a separate python server instance) by opening a terminal window and running
python manage.py runsqsworker - You will see logging from the sqs worker in that terminal
Note that if you change any code, that would be needed in the instance of the API Server running under SQS, you will need to kill the runsqsworker in the terminal window, and restart it.


