本项目所涉及到的技术栈:React、TypeScript 、StoryBook、sass
第三方库的使用:react-transtion fontawesome、axios、classnames
React 是组件的世界,创造各种组件就是它的终极目标。
所以我打算仿照 Antd 的源码准备自己先写一些基础的组件(之前实习的时候也对 antd 的基础组件进行了二次封装,所以有一点经验),同时也为了夯实基础知识、也算是对自己的一种考验吧~
这里记录一下遇到的问题以及解决方法
定制一系列主题变量、然后应用到各个组件上
$white: #fff !default;
$gray-100: #f8f9fa !default;
$gray-200: #e9ecef !default;
$gray-300: #dee2e6 !default;
$gray-400: #ced4da !default;
$gray-500: #adb5bd !default;
$gray-600: #6c757d !default;
$gray-700: #495057 !default;
$gray-800: #343a40 !default;
$gray-900: #212529 !default;
···
Mixin 的使用,是可以重用的代码块。
使用@mixin 命令,定义一个代码块。
@mixin left {
    float: left;
   include  margin-left: 10px;
  }
使用@include 命令,调用这个 mixin
 div {
    @include left;
  }
mixin 的强大之处,在于可以指定参数和缺省值。
    @mixin left($value: 10px) {
    float: left;
    margin-right: $value;
  }
使用的时候,根据需要加入参数:
   div {
    @include left(20px);
  }
统一导出
@import "./variables";
// layout
@import "./reboot";
// mixin
@import "./mixin";
// animation
@import "../styles/animation";
// Button
@import "../components/Button/style" ···;(一)、Button
开发流程:
1、确定类型
2、定义接口
3、从 props 取出参数
4、根据属性计算classes
5、根据参数UI组件
6、编写测试 case
7、最后编写 stories 方便预览
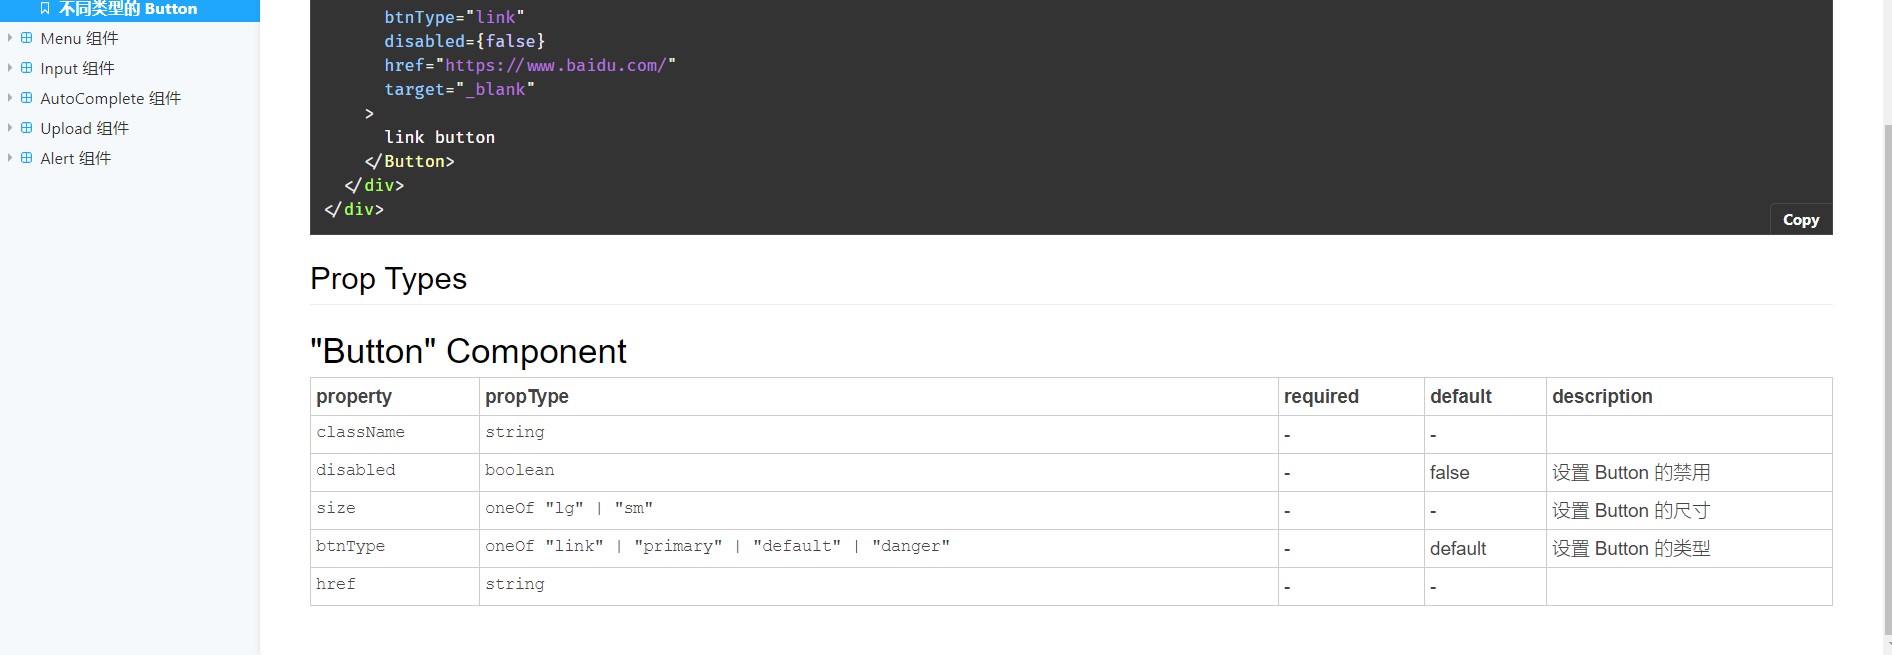
首先需要了解 react 官方定义的 ts 类型 例如 ReactNode, FC, ButtonHTMLAttributes,AnchorHTMLAttributes
使用 ts 时、我们需要考虑到各个参数的类型、确定类型,定义接口,使用接口去规范和约束代码
这里遇到一个问题:ts 高级类型
(1)button 上的属性有可能在 button 上的必须的 但是在 a 上不能填写 button 必须的属性 反之亦然 所以需要把属性设置为可选的 Partial
Partial的作用就是将某个类型里的属性全部变为可选项?。
// React.ButtonHTMLAttributes<HTMLButtonElement> 拿到button所有原生属性
// NativeButtonProps 为原生属性和扩展属性的集合
type NativeButtonProps = BaseButtonProps & ButtonHTMLAttributes<HTMLElement>;
type AnchorButtonProps = BaseButtonProps & AnchorHTMLAttributes<HTMLElement>;
export type ButtonProps = Partial<NativeButtonProps & AnchorButtonProps>;
主要代码~ 可以看出 button 组件还是非常简单的
const classes = classNames("btn", className, {
  [`btn-${size}`]: size,
  [`btn-${btnType}`]: btnType,
  disabled: btnType === "link" && disabled,
});

if (btnType === "link") {
  return (
    <a href={href} className={classes} {...restProps}>
      {children}
    </a>
  );
} else {
  return (
    <button disabled={disabled} className={classes} {...restProps}>
      {children}
    </button>
  );
}
测试 case 这里使用的是jest react 默认支持的测试框架 很好用 使用它需要看看文档、学习基础测试如何编写
简单示例
const sum = require("./sum");
test("adds 1 + 2 to equal 3", () => {
  expect(sum(1, 2)).toBe(3);
});
button 测试 case 刚开始眼睛看晕了~~~
describe('test Button component', () => {
  it('should render the correct default button', () => {
    const wrapper = render(<Button {...defaultProps}>nice</Button>)
    const element = wrapper.getByText('nice') as HTMLButtonElement
    expect(element).toBeInTheDocument()// 证明元素存在
    expect(element.tagName).toEqual('BUTTON')
    expect(element).toHaveClass('btn btn-default')
    expect(element.disabled).toBeFalsy()

    fireEvent.click(element)
    expect(defaultProps.onClick).toHaveBeenCalled()
  })

  it('should render the correct component based on different props', () => {
    const wrapper = render(<Button {...testProps}>nice</Button>)
    const element = wrapper.getByText('nice')
    expect(element).toBeInTheDocument()
    expect(element).toHaveClass('btn-primary btn-lg klass')
  })

  it('should render a link when btnType equals link and href is provided', () => {
    const wrapper = render(<Button {...testProps} btnType='link' href='https://www.baidu.com/'>nice</Button>)
    const element = wrapper.getByText('nice')
    expect(element).toBeInTheDocument()
    expect(element.tagName).toEqual('A')
    expect(element).toHaveClass('btn btn-link')
  })

  it('should render disabled button when disable set to true', () => {
    const wrapper = render(<Button {...disabledProps}>nice</Button>)
    const element = wrapper.getByText('nice') as HTMLButtonElement
    expect(element).toBeInTheDocument()
    expect(element.disabled).toBeTruthy()
    fireEvent.click(element)
    expect(disabledProps.onClick).not.toHaveBeenCalled()
  })
})
最后一步 编写 stories 文件 展示我们的 button
const defaultButton = () => (
  <Button onClick={action("clicked")}>default button</Button>
);

const buttonWithSize = () => (
  <div>
    <Button size="lg">large button</Button>
    <Button size="sm">small button</Button>
  </div>
);

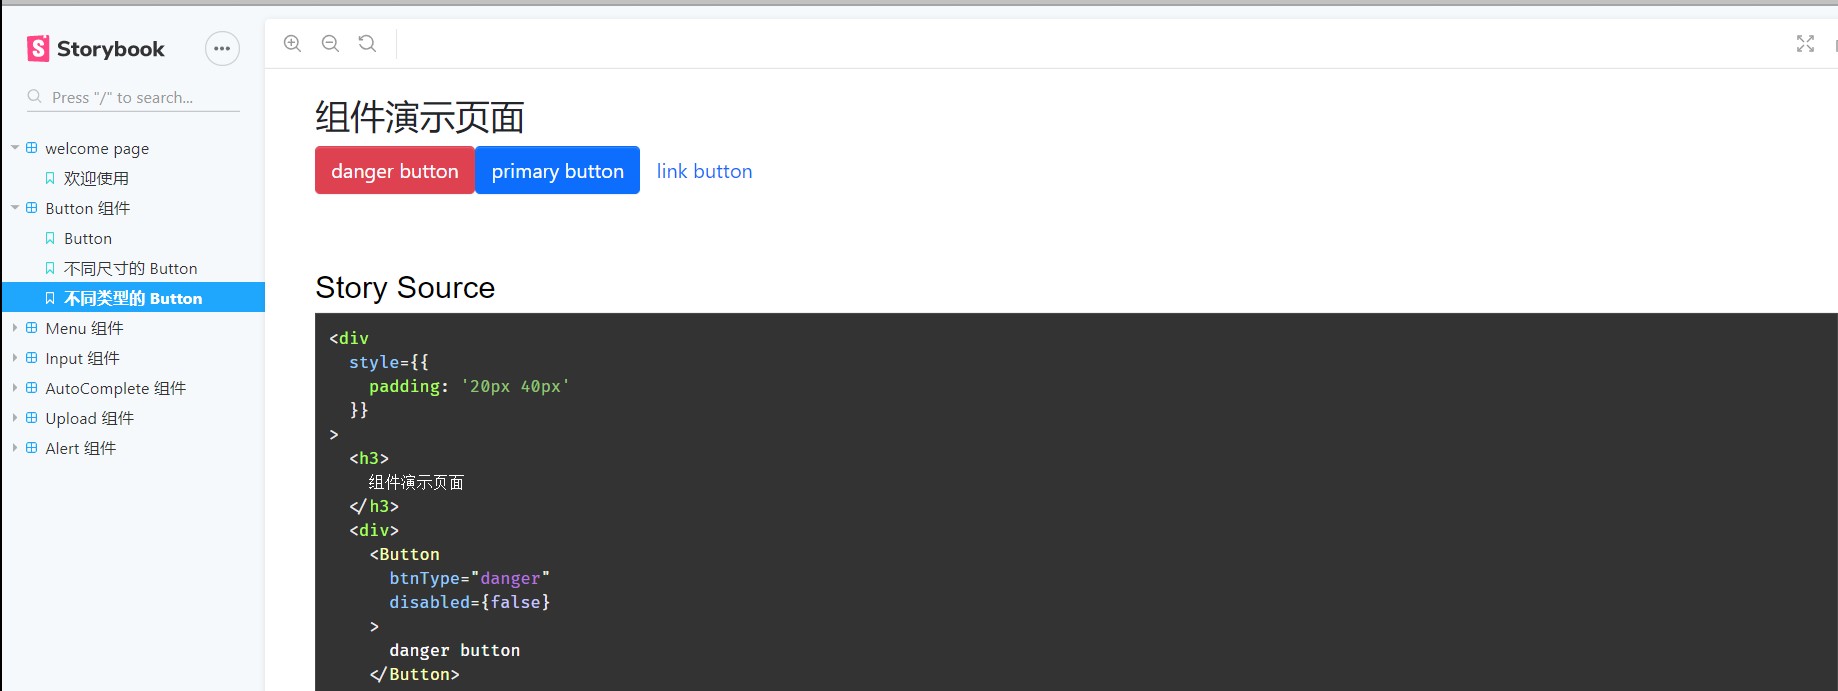
const buttonWithType = () => (
  <div>
    <Button btnType="danger">danger button</Button>
    <Button btnType="primary">primary button</Button>
    <Button btnType="link" target="_blank" href="https://www.baidu.com/">
      link button
    </Button>
  </div>
);

storiesOf("Button 组件", module)
  .add("Button", defaultButton)
  // .add('不同尺寸的 Button', buttonWithSize, {info: {inline: false}})
  .add("不同尺寸的 Button", buttonWithSize)
  .add("不同类型的 Button", buttonWithType);
效果
到这组件就算完成了~~~
(二)Menu 组件
横向模式纵向模式处理的方式会有不同
由于 props.children 可以说任意类型的、如果 children 是函数,那么调用 map 就会报错~但是我们只希望 children 是 Menu.SubMenu 于是
SubMenu.displayName = 'SubMenu'
·······························
 const { displayName } = childElement.type
 if (displayName === 'MenuItem') {
        return React.cloneElement(childElement, {
          index: `${index}-${i}`
        })
      } else {
        console.error(
          'warning: Menu has a child which is not a MenuItem component'
        )
      }
react 内置属性帮助我们判断类型,cloneElement 该方法以 element 作为起点,克隆并返回一个新的 React 元素。所产生的元素将具有原始元素的 props ,新的 props 为浅层合并。 新的子元素将取代现有的子元素, key 和 ref 将被保留,之所以使用这个方法是因为我们需要知道是那个 menu 被选中了,另外就是过渡动画的实现依靠 react-transtion这个库了,对一些动画细节的处理、多看文档 unMountOnExit(默认情况下,子组件在达到“退出”状态后仍然挂载。如果你希望在组件退出后卸载组件,就要设置unmountOnExit)、为什么要这样:因为使用添加切换类名的方式的时候如果设置了 display:none 那么所有的动画将会失效,所以需要封装一个动画过渡组件~~~
(三)Input 组件
ts Omit 方法的使用
// Omit用来忽略InputHTMLAttributes里的size 这样就不会产生冲突
export interface InputProps
  extends Omit<InputHTMLAttributes<HTMLElement>, "size"> {
  /**设置 Input 的禁用 */
  disabled?: boolean;
  /**设置 Input 的尺寸 */
  size?: InputSize;
  /**设置 Input 的图标 */
  icon?: IconProp;
  /**在 Input 之前放置元素 */
  prepend?: string | ReactElement;
  /**在 Input 之后放置元素 */
  append?: string | ReactElement;
  onChange?: (e: ChangeEvent<HTMLInputElement>) => void;
}
这里实现了一个受控组件,类似于 vue 中 v-model
const ControlledInput = () => {
  const [value, setValue] = useState("");
  return (
    <Input
      value={value}
      defaultValue={value}
      onChange={(e) => {
        setValue(e.target.value);
      }}
    />
  );
};
还有一些细节处理~~~
(三)Icon组件
组件就基本上完全依靠第三方库来实现了、算是掌握了fortawesome的使用吧~~~
(四) AutoComplete 组件
Input输入内容自动联想
做了loading等待状态,异步发送请求,自定义渲染子列表,支持 Input 组件的所有属性 支持键盘事件选择
自定义Hook实现防抖效果
import { useState, useEffect } from "react";
function useDebounce(value: any, delay = 300) {
  const [debouncedValue, setDebouncedValue] = useState(value);
  useEffect(() => {
    const handler = setTimeout(() => {
      setDebouncedValue(value);
    }, delay);

    return () => {
      clearTimeout(handler);
    };
  }, [value, delay]);

  return debouncedValue;
}

export default useDebounce;
// useEffect 处理函数的副作用 当useEffect函数返回一个函数的时候代表着下次update的时候清理函数的副作用
//  这里正好利用这一点来clear
选中状态是怎么实现的~ 会传一个index和当前的index比较,如果相同那么就是选中状态
(五)Upload组件
这个相对比较复杂、做了上传进度条显示、上传状态展示、以及上传结果展示
1、事件代理
const handleClick = () => {
    if (uploadRef.current) {
      uploadRef.current.click();
    }
  };
2、多个文件上传 遇到的bug
setFileList([_file, ...fileList]); bug 多个文件上传的时候 只有一个文件显示 异步更新的bug 需要回调函数来解决
setFileList((prevFile)=>{
    return ....
})
3、声明周期
(1)上传前的生命周期实现
 const uploadFiles = (files: FileList) => {
    const postFile = Array.from(files);
    postFile.forEach((file) => {
      if (!beforeUpload) {
        post(file);
      } else {
        const result = beforeUpload(file);
        if (result && result instanceof Promise) {
          result.then((progressFile) => {
            post(progressFile);
          });
        } else if (result !== false) {
          post(file);
        }
      }
    });
  };
(2)上传中需要显示进度条
 axios
      .post(action, formData, {
        headers: {
          ...headers,
          "Content-Type": "multiple/form-data",
        },
        // 支持携带cookie 这是axios默认支持的功能
        withCredentials,
        onUploadProgress: (e) => {
          let percentage = Math.round((e.loaded * 100) / e.total) || 0;
          if (percentage < 100) {
            updataFileList(_file, { percent: percentage, status: "uploading" });
            if (onProgress) {
              onProgress(percentage, _file);
            }
          }
        },
      })
      .then((resp) => {}
axios本身支持
(3)拖动上传的实现
export const Dragger: FC<DraggerProps> = (props) => {
  const { onFile, children } = props;
  const [dragOver, setdragOver] = useState(false);
  const classes = classNames("uploader-dragger", {
    "is-dragover": dragOver,
  });
  const handleDrag = (e: DragEvent<HTMLElement>, over: boolean) => {
    e.preventDefault();
    setdragOver(over);
  };
  const handleDrop = (e: DragEvent<HTMLElement>) => {
    e.preventDefault();
    setdragOver(false);
    onFile(e.dataTransfer.files);
  };
  return (
    <div
      className={classes}
      onDragOver={(e) => {
        handleDrag(e, true);
      }}
      onDragLeave={(e) => {
        handleDrag(e, false);
      }}
      onDrop={handleDrop}
    >
      {children}
    </div>
  );
};
主要是drag事件的 使用其他的逻辑问题与点击上传相同
3、测试使用以及发布npm
npm link 软连接到本地测试项目进行测试没有异常后 可以进行发布
注册账号
    npm  whoami 检查是否登陆
    npm adduser 创建账号
    npm login   登陆账号

// 发布前执行
package.json
    "scripts": {
        // "prepublish": "npm run build-lib" // 即将废弃
        "prepublishOnly": "npm run build-lib" // 发布前要做的事
    }
    "files": [      // 表示要把哪些资源上传到npm仓库上去,不写默认使用 .gitignore 内的信息
        "lib"
    ],

npm publish  发布包
打包需要注意的事情
解决用户安装我们的包时安装了两份react和react-dom库

用户在安装时,该处声明的依赖不会被安装
"peerDependencies": {
    "react": ">=16.8.0",
    "react-dom": ">=16.8.0"
},

删除 dependencies 内的两个依赖
"react": "^16.13.1",
"react-dom": "^16.13.1",

然而开发时还要使用,所以将删除的引用,重新添加到devDependencies中
"devDependencies": {
    "react": "^16.13.1",
    "react-dom": "^16.13.1",
}

