-
Notifications
You must be signed in to change notification settings - Fork 6
Getting Started
###Create a View Model
For our example, let's assume we have a document type with the alias BlogEntry set up with the following properties:
| Property Name | Alias | Type |
|---|---|---|
| Title | title | Textstring |
| PostedDate | postedDate | Date Picker |
| Content | content | Richtext editor |
We can create a class for this document type:
[UmbracoEntity(AutoMap = true)]
public class BlogEntryViewModel
{
	public string Title { get; set; }
	public DateTime PostDate { get; set; }

	[UmbracoRichTextProperty]
	public string Content { get; set; }
}UmbracoEntity tells Vault that it can create an instance of this class. Setting AutoMap to true instructs Vault to attempt to fill all properties that have public setters unless they are explicitly ignored using the UmbracoIgnoreProperty attribute.
The UmbracoRichTextProperty attribute is a special case that instructs Vault to process the property as rich text content, which includes the processing of macros.
You can get hydrated instances of the model into your view several different ways. Here are a few basic examples of explicitly getting hydrated models:
// Gets a BlogEntry hydrated from the current Node Id
var model = Vault.Context.GetCurrent<BlogEntryViewModel>();
// Gets a BlogEntry hydrated from a specific Node Id
var model = Vault.Context.GetContentById<BlogEntryViewModel>(myNodeId);So how does it work? By default, Vault will look at each property type, lower-case the first character and use the result as a property alias for which to get data from Umbraco (i.e. the Title class property will be given the value of the title cms property).
Like most conventions in Vault, there are ways to override the default behavior. More on that later.
Once your have your hydrated instance, simply pass it into your view:
return CurrentTemplate(model);public class BlogEntryController : RenderMvcController
{
public override ActionResult Index(RenderModel model)
{
var vm = Vault.Context.GetCurrent<BlogEntryViewModel>();
// Perform additional manipulation to the view model here
vm.AdditionalProperty = "This is a test";
return CurrentTemplate(vm);
}
}Of course, this setup requires that we create a controller for every template, even simple ones. That's not helping us at all. Let's fix that below.
Vault ships with two default controllers that extend/replace the Umbraco default controller. These controllers make it incredibly fast and easy to wire up strongly-typed view models to views.
Here's how to get started.
###Default Controller Setup
In your ApplicationStarting event (often found in a class extending ApplicationEventHandler), place the following code:
DefaultRenderMvcControllerResolver
	.Current
	.SetDefaultControllerType(
typeof(VaultRenderMvcController));Let's create a view model (just like above). Note the namespace this time.
namespace MySite.Models.ContentModels
{
	[UmbracoEntity(AutoMap = true)]
	public class BlogEntryViewModel
	{
		public string Title { get; set; }
		public DateTime PostDate { get; set; }

		[UmbracoRichTextProperty]
		public string Content { get; set; }
	}
}
An important note about naming conventions: the Vault generic controller will take the name of the current template, append the text "ViewModel" and try to create that type using the currently-registered namespaces (see next step). This means that when using the Vault default controllers, it is important that the name of the View Model matches the Template Alias, not the Document Type Alias.
This is less important when your Document Types and Templates having matching aliases, but of course this isn't always the case.
Now, let's register the namespace and assembly with Vault (Note: in the upcoming version of Vault, this step will likely be removed).
Vault.RegisterViewModelNamespace(
	"MySite.Models.ContentModels",
"MySiteAssembly");Finally, we can create our template, called BlogEntry in Umbraco:
@model MySite.Models.ContentModels.BlogEntryPage
@{
    Layout = "MainLayout.cshtml";
}

	<h1>@Model.Title</h1>
	<div>@Model.PostedDate.ToShortDateString()</div>
	<div>
    	@Html.Raw(@Model.Content)
</div>By default, your view probably had something like this at the top:
@inherits Umbraco.Web.Mvc.UmbracoTemplatePageThis is necessary when using Umbraco's default controller, but it is not necessary (or correct) when using the VaultRenderMvcController.
You will get a runtime error if you leave the @inherits ... UmbracoTemplatePage code at the top of any view in the render chain (including your parent templates). Simply remove it and be happy you no longer have to deal with it.
###Hold on, what if I need Umbraco node information in my View Model?
There are a variety of reasons one might need Umbraco node information available. The fastest way to get this information in a Vault-hydrated view model is to add a property like this to your model class:
public IPublishedContent CmsContent { get; set; }The name of the property is not important, but the type is. Note that if you have more than one IPublishedContent property in a class, only the first one will get set.
This property will get set to the node data that is hydrating the model, not necessarily the current node's data. This is especially important when Vault fills out deeper object graphs and/or lists.
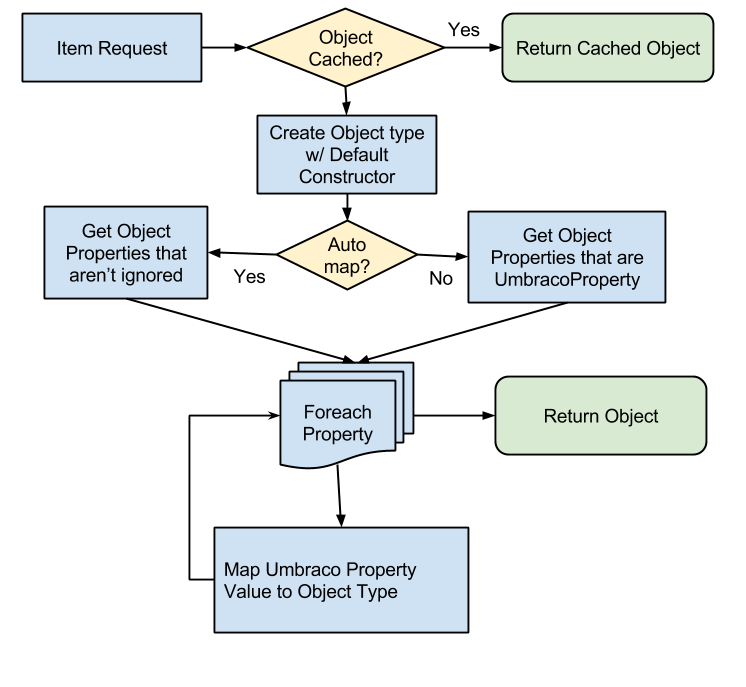
When an object is requested to be mapped, this is a high level view of the logic that decides how to fulfil the request. See Extending Vault for more detail about specific property mapping logic and extensibility points.
