vscode install and configure
Make sure you have already installed the UnitTestBot C/C++ server.
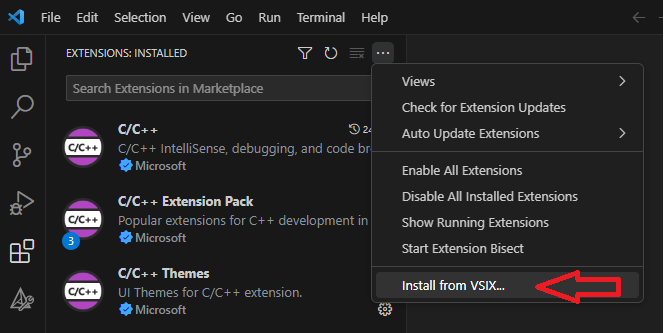
To install the plugin from the VSIX file:
- Download a ZIP archive with the release artifact. You can choose the release on GitHub. Unarchive this ZIP file.
- In your Visual Studio Code, go to File > Preferences > Extensions and select Views and More Actions.... Select Install from VSIX.
- In the folder with the unarchived files from the release artifact, select the
utbot_plugin.vsixfile and press Install.
Now the UnitTestBot C/C++ plugin is displayed in File > Preferences > Extensions > Installed.

Go to File > Open Folder and select the one containing the project to generate tests for.

To start using UnitTestBot C/C++, follow the wizard:
- The wizard opens automatically, if you use UnitTestBot C/C++ for your project for the first time.
- To open the wizard on demand, go to View > Command Palette....

- Enter Run UTBot: Quickstart Wizard. Click on it.

The UnitTestBot C/C++ server and the client can be installed on the same or on different machines. WSL and Docker also behave differently: WSL automatically forwards the source paths to the server host, while Docker requires establishing an SSH connection. Choose one of two paths in the wizard to start using UnitTestBot C/C++.
If the UnitTestBot C/C++ server and the client are installed on the same machine, or the server is installed via WSL (without using Docker), make sure the Default server configuration on localhost (or WSL2) checkbox is selected.

Follow the default procedure — press Next until configuration is complete.
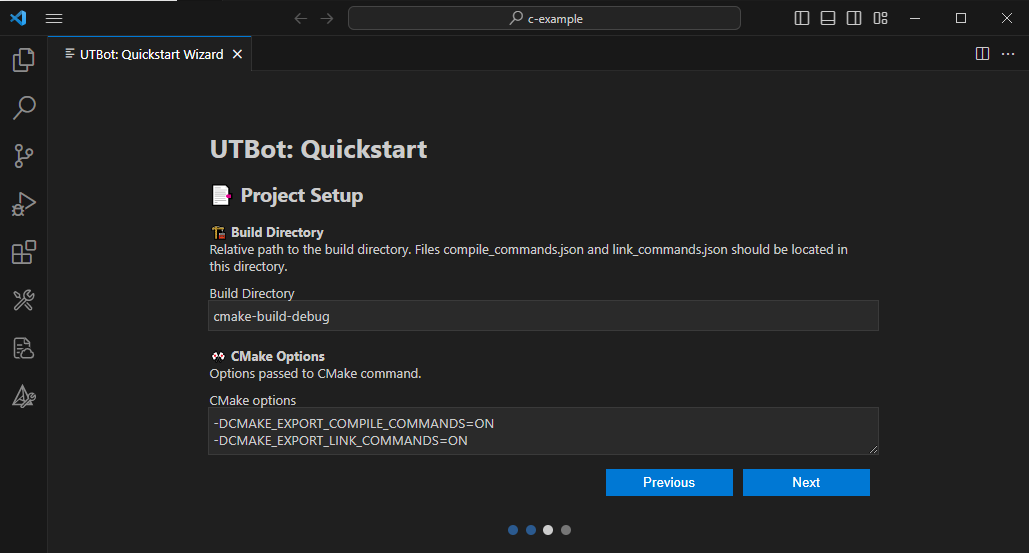
The default settings are:
-
Host:
localhost -
gRPC port:
2121 - SFTP port: not used
- Project Path On Server: autofilled
-
Build Directory:
build -
CMake options:
-DCMAKE_EXPORT_COMPILE_COMMANDS=ON-DCMAKE_EXPORT_LINK_COMMANDS=ON
If the UnitTestBot C/C++ server and the client are installed on different machines, or the server is installed via Docker, you need to sync files within a local directory to a remote server directory using SSH protocol.
- Install the SFTP plugin for your Visual Studio Code.
- Go to View > Command Palette... and enter SFTP: config. Enter your values in
sftp.json:
{
   "name": "UTBot Server",
   "host": "127.0.0.1", // IP address of the UnitTestBot server
   "protocol": "sftp",
   "port": 5522,
   "username": "utbot",
   "password": "utbot",
   "remotePath": "/home/utbot/remote/c-example/", // the path to your project on the server host
   "uploadOnSave": true,
   "useTempFile": false,
   "openSsh": false
}- Go to View > Command Palette... and enter SFTP: Sync Local -> Remote. Check SFTP Explorer for the uploaded files.

-
Go to View > Command Palette... and enter Run UTBot: Quickstart Wizard.
-
Clear the Default server configuration on localhost (or WSL2) checkbox.
-
Enter your values in the setting fields — the same as in
sftp.json:- Host: your host name or IP address
-
gRPC port:
5521 -
SFTP port:
5522 - Project Path On Server: the path to your project on the server host
-
Build Directory:
build -
CMake options:
-DCMAKE_EXPORT_COMPILE_COMMANDS=ON-DCMAKE_EXPORT_LINK_COMMANDS=ON

Follow the default procedure — press Next until configuration is complete.
The UnitTestBot C/C++ plugin builds and configures the project under test automatically — see notifications.